In this article, We are going to cover Creating ECR Repository in AWS, push Docker Image to AWS ECR, Install AWS CLI on Ubuntu
Table of Contents
Prerequisites
- Ubuntu 16/18/20.04 LTS
- SSH access with sudo privileges
- Firewall Port: 3000
Install Node JS and NPM on Ubuntu
If you are using Ubuntu OS then Install Node JS and NPM on Ubuntu using below articles
How to Install Node.js and NPM on Ubuntu 20.04 LTS
How to Install Latest Node.js and NPM on Ubuntu 19.04,18.04/16.04 LTS
If you are using other OS then follow Node JS Official Site to Install if not installed
Step #1: Creating Node.js Application
Lets create the directory named nodejsdocker to add node js files to test.
sudo mkdir nodejsdocker
Navigate to nodejsdocker directory
cd nodejsdocker
Create the package.json file where you will specify all dependencies of your Node JS application
sudo nano package.json
paste the below lines into it
{
  "name": "Docker_NodeJS_App",
  "version": "0.1",
  "description": "Node.js Application with Docker",
  "main": "server.js",
  "scripts": {
    "start": "node server.js"
  },
  "dependencies": {
    "express": "^4.17.1"
  }
}
Next create the server.js page to test Node JS application with express framework
sudo nano server.js
Paste the below lines in it
'use strict';

const express = require('express');

// Constants
const PORT = 3000;
const HOST = '0.0.0.0';


const app = express();
app.get('/', (req, res) => {
res.send('Testing Node JS Application');
});

app.listen(PORT, HOST);
console.log(`Running on http://${HOST}:${PORT}`);
create a .dockerignore file and paste the below lines
sudo nano .dockerignore
node_modules
npm-debug.log
Step #2: Install Docker and Create Docker Image
Install below prerequisite packages
sudo apt-get install apt-transport-https ca-certificates curl gnupg-agent software-properties-common
Add below Docker’s official GPG key:
curl -fsSL https://download.docker.com/linux/ubuntu/gpg | sudo apt-key add -
Add the Docker APT repository to your system
sudo add-apt-repository "deb [arch=amd64] https://download.docker.com/linux/ubuntu $(lsb_release -cs) stable"
Update the Docker Repository Information
sudo apt-get update
Install Docker on Ubuntu
sudo apt-get install docker-ce
Once installed verify Docker Service status
sudo systemctl status docker
Output:
docker.service - Docker Application Container Engine

Loaded: loaded (/lib/systemd/system/docker.service; enabled; vendor preset: enabled)

Active: active (running) since Sun 2020-03-22 07:43:44 UTC; 32s ago

Docs: https://docs.docker.com

Main PID: 118265 (dockerd)

Tasks: 10

CGroup: /system.slice/docker.service

└─118265 /usr/bin/dockerd -H fd:// --containerd=/run/containerd/containerd.sock
Running Docker commands without sudo
By default, Docker requires administrator privileges, Docker group is created when during the installation of Docker packages.
Add your system user to docker group.
sudo usermod -aG docker $USER
Change the docker.sock permission
sudo chmod 666 /var/run/docker.sock
Next create the Dockerfile with below command in Project root directory
sudo nano Dockerfile
Paste the below Dockerfile instructions in it
FROM node:12

# To Create nodejsapp directory
WORKDIR /nodejsapp

# To Install All dependencies

COPY package*.json ./

RUN npm install

# To copy all application packages
COPY . .

# Expose port 3000 and Run the server.js file to start node js application
EXPOSE 3000
CMD [ "node", "server.js" ]
Now build the Docker Image using below command
sudo docker build -t nodejsdocker .
Step #3: Install AWS CLI on Ubuntu
Download the aws cli bundle using below command
sudo curl https://s3.amazonaws.com/aws-cli/awscli-bundle.zip -o awscli-bundle.zip
Install the unzip and python on Ubuntu if not installed
sudo apt install unzip python
Extract the aws cli bundle setup
sudo unzip awscli-bundle.zip
Configure the AWS CLI on Ubuntu
sudo ./awscli-bundle/install -i /usr/local/aws -b /usr/local/bin/aws
Verify the AWS CLI version
aws --version
Output:
aws-cli/1.18.97 Python/2.7.18rc1 Linux/5.4.0-1015-aws botocore/1.17.20
Configure AWS CLI with your Access Key ID, Secret Access key and region
aws configure
Step #4: Creating ECR Repository in AWS
Login to AWS console
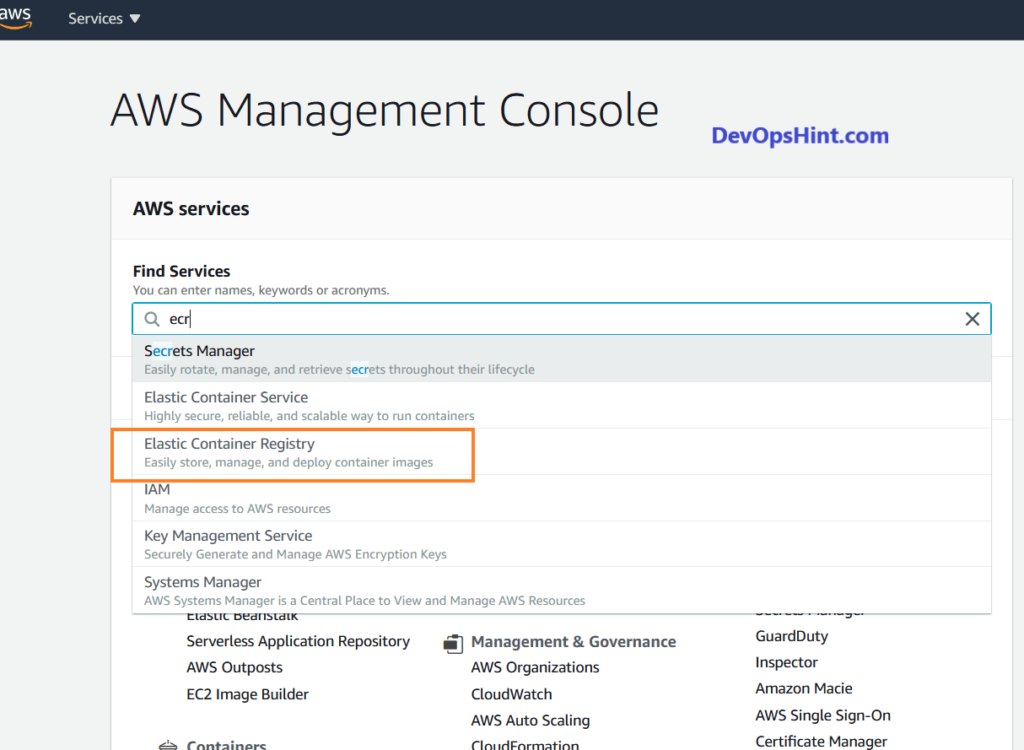
Find the AWS Elastic Container Registry Service as shown below and Click on Elastic Container Registry

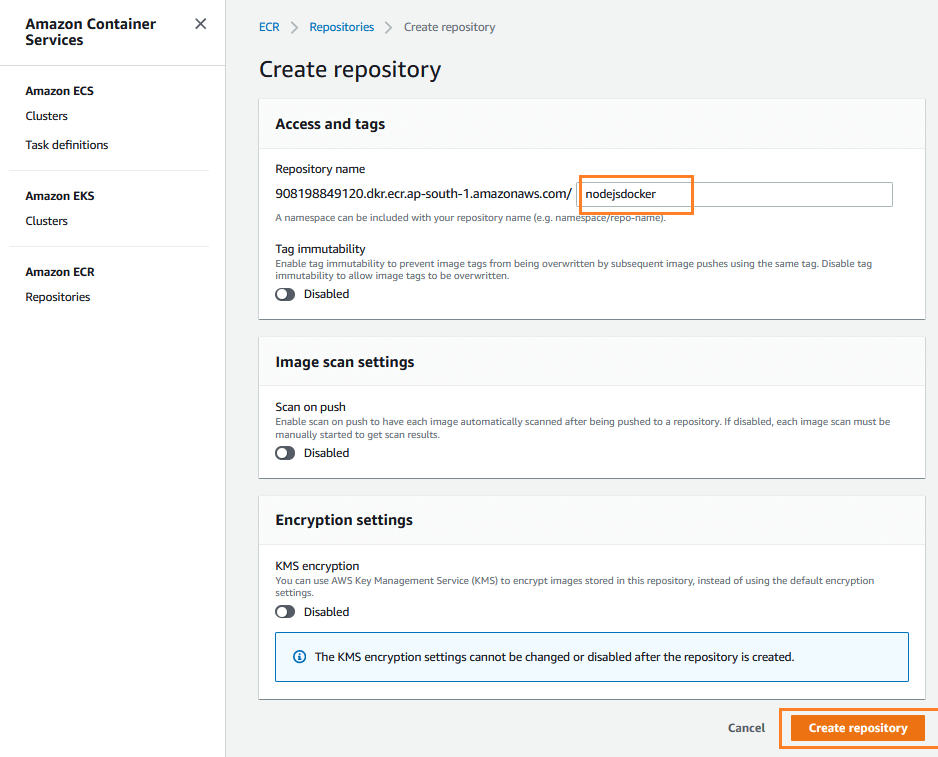
Click on Create repository

Enter the name of your ECR Name and click on Create repository.

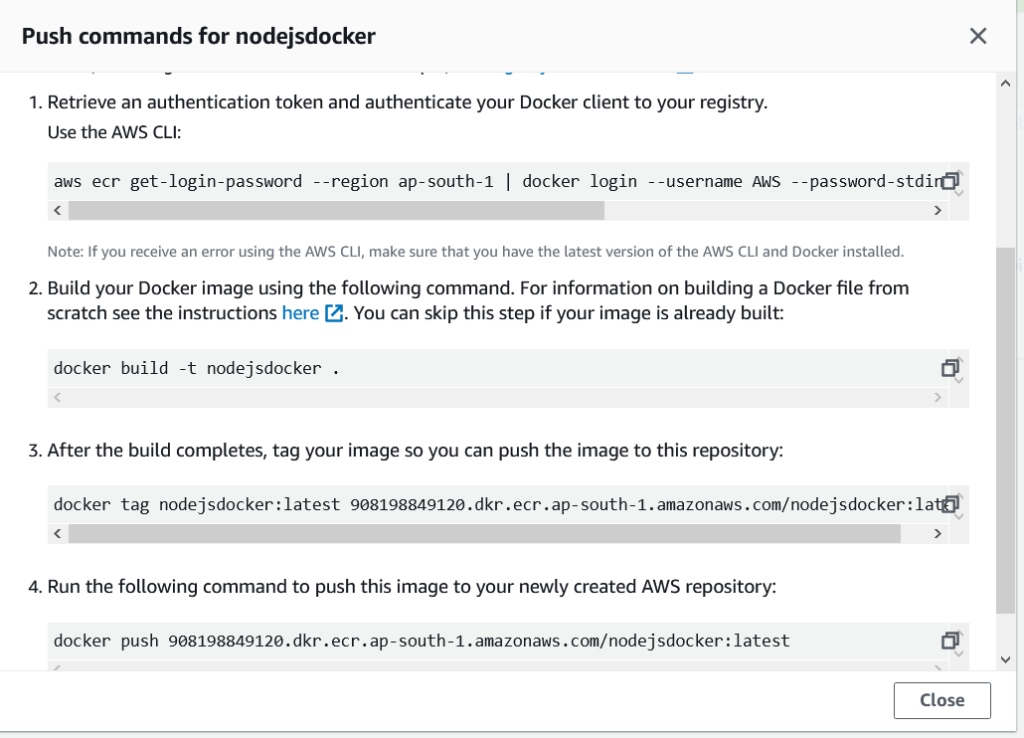
once created, you will see below message and click on View push commands.

you will see below push commands

Step #5: push Docker Image to AWS ECR
Build node js docker Image using below command
docker build -t nodejsdocker .
Output:
Sending build context to Docker daemon   5.12kB
Step 1/7 : FROM node:12
12: Pulling from library/node
0400ac8f7460: Pull complete
fa8559aa5ebb: Pull complete
da32bfbbc3ba: Pull complete
e1dc6725529d: Pull complete
572866ab72a6: Pull complete
63ee7d0b743d: Pull complete
f324c5002e7c: Pull complete
31b678b0b485: Pull complete
6fde07dc44ee: Pull complete
Digest: sha256:b7aa57bb141b7adca179797a88f6dc350603124f9a88e4d78d9a67d0ad129350
Status: Downloaded newer image for node:12
 ---> 1f560ce4ce7e
Step 2/7 : WORKDIR /usr/src/app
 ---> Running in d3dac97c135e
Removing intermediate container d3dac97c135e
 ---> adf7d202e8db
Step 3/7 : COPY package*.json ./
 ---> 9c5d51a2a102
Step 4/7 : RUN npm install
 ---> Running in 85edb2881d24
npm notice created a lockfile as package-lock.json. You should commit this file.
npm WARN [email protected] No repository field.
npm WARN [email protected] No license field.

added 50 packages from 37 contributors and audited 50 packages in 2.33s
found 0 vulnerabilities

Removing intermediate container 85edb2881d24
 ---> 6a7e04c7aa83
Step 5/7 : COPY . .
 ---> 60434160ee0f
Step 6/7 : EXPOSE 3000
 ---> Running in 7fc84e3e8930
Removing intermediate container 7fc84e3e8930
 ---> fc991e89496d
Step 7/7 : CMD [ "node", "server.js" ]
 ---> Running in aae14b412c5d
Removing intermediate container aae14b412c5d
 ---> d63e42554b69
Successfully built d63e42554b69
Successfully tagged nodejsdocker:latest
Error: “no basic auth credentials” message while pushing docker image to AWS ECR
OR
denied: Your authorization token has expired. Reauthenticate and try again.
Solution:
Login to AWS ECR using below command
$(aws ecr get-login --no-include-email --region ap-south-1)
Output:
WARNING! Using --password via the CLI is insecure. Use --password-stdin.
WARNING! Your password will be stored unencrypted in /home/ubuntu/.docker/config.json.
Configure a credential helper to remove this warning. See
https://docs.docker.com/engine/reference/commandline/login/#credentials-store

Login Succeeded
Tag the Docker Image using below command
docker tag nodejsdocker:latest 908198849120.dkr.ecr.ap-south-1.amazonaws.com/nodejsdocker:latest
push Docker Image to AWS ECR using below command
docker push 908198849120.dkr.ecr.ap-south-1.amazonaws.com/nodejsdocker:latest
Output:
The push refers to repository [908198849120.dkr.ecr.ap-south-1.amazonaws.com/nodejsdocker]
724e8b3bebbb: Pushed
9d59d5d1d8e1: Pushed
b3cdfc5ce000: Pushed
609e2d139445: Pushed
19571ff21ce3: Pushed
679834dd79ff: Pushed
0b6541f04a0d: Pushed
8211c12c1c23: Pushed
1d3ec06e3d4f: Pushed
9e5330403dba: Pushed
8bd20dc0b7e5: Pushed
94b70b410c2a: Pushed
3567db1eb737: Pushed
latest: digest: sha256:83f43c6da0803706086e95dc240d4f3cc86f9c4e714ce6ad358f87bf3b78d4e7 size: 3047
successfully pushed Docker Image to AWS ECR, login AWS ECR to check the Docker Image

We have covered, How to push Docker Image to AWS ECR
Conclusion
We have covered, Creating Node.js Application, Install Docker on Ubuntu using APT Repo, Install AWS CLI on Ubuntu, Creating ECR Repository in AWS, push Docker Image to AWS ECR.
Related Articles:
How to connect to AWS EC2 Instance using MobaXTerm
How to Enable Password Authentication for AWS EC2
How to Connect EC2 Instance using Putty
How to Transfer files to AWS Instance using WinSCP [2 Steps]
How to Create AWS DocumentDB and Connect [3 steps]
1 thought on “How to push Docker Image to AWS ECR”