In this article, we will walk through the process of setting up a web application using the LAMP stack on Ubuntu 24.04 LTS.
Table of Contents
What is LAMP Stack?
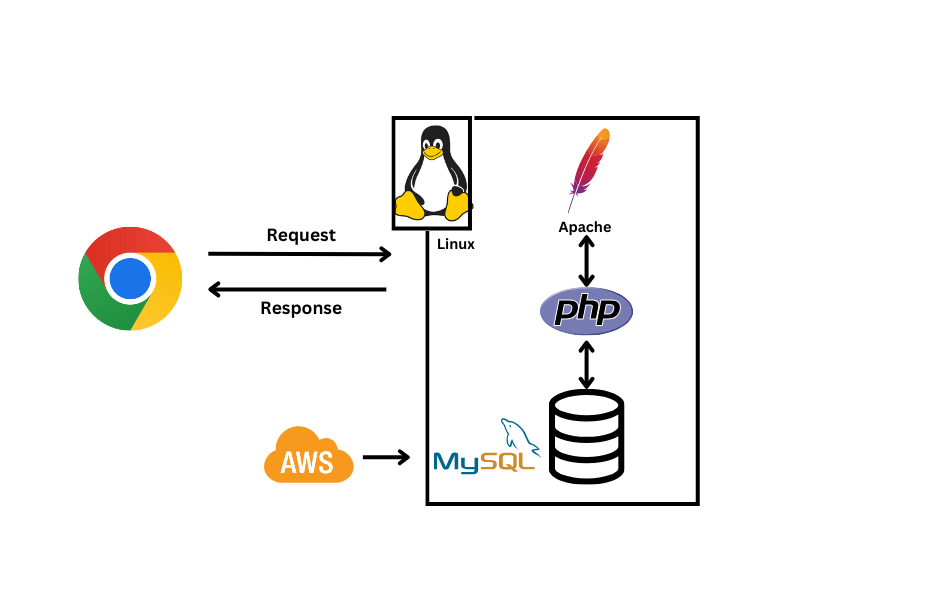
LAMP—an acronym for Linux, Apache, MySQL, and PHP—is one of the most popular open-source stacks for developing and deploying dynamic web applications. Each component plays a crucial role:
- Linux serves as the operating system, providing stability and security.
- Apache is the web server responsible for handling HTTP requests.
- MySQL (or MariaDB) is the database system used for storing application data.
- PHP is the server-side scripting language that enables dynamic content generation.
Prerequisites
- AWS Account with Ubuntu 24.04 LTS EC2 Instance.
- A user with sudo privileges.
- Basic Knowledge of Linux, Apache, MySQL DB, and PHP.
Setup Web Application with LAMP Stack on Ubuntu 24.04 LTS
Below diagram represents the architecture of a LAMP stack web application deployed on an Ubuntu 24.04 LTS server. Let’s setup LAMP Stack web app on Ubuntu 24.04 LTS EC2 instance.
LAMP Stack based real time applications
- Live Polling System
- Live Chat Application
- Stock Market Live Updates
- Collaborative Document Editing
- Real-Time Notification System
- Online Multiplayer Game Dashboard
- Live Sports Scoreboard
- Auction System with Live Bidding
- Real-Time Order Tracking System
- IoT Dashboard with Live Sensor Data
Step #1:Install Apache Web Server on Ubuntu 24.04 LTS
First, update the package manager cache to ensure your package index is up to date.
sudo apt update
Install Apache web server using apt package manager on Ubuntu 24.04 LTS.
sudo apt install apache2 -y
Start the Apache web service using systemctl command-line tool.
sudo systemctl start apache2Enable the Apache web service to start automatically at boot time.
sudo systemctl enable apache2Verify that Apache web service is running by checking its status.
sudo systemctl status apache2
Confirm that Apache is serving the default web page by visiting Public_IP_address in your browser.
http://Public_IP_address
Step #2:Install MySQL 8 Database Server on Ubuntu 24.04 LTS
In this step, we will install MySQL, secure it, and configure authentication to work with PHP.
Install MySQL server with apt package manager.
sudo apt install mysql-server -y
Start the MySQL service using systemctl command-line tool.
sudo systemctl start mysqlEnable the MySQL service to start automatically at boot time.
sudo systemctl enable mysqlView the MySQL service is running by checking its status.
sudo systemctl status mysql
After installing and Verifying MySQL service, it is essential to secure the database server by removing unnecessary users, setting password policies, and disabling remote root access.
MySQL provides a built-in script called mysql_secure_installation to help with this process.
Run MySQL secure installation on Ubuntu 24.04 LTS.
sudo mysql_secure_installation
If you just installed MySQL, press ENTER (default root login uses auth_socket).
- Answer ‘Y’ to remove anonymous users.
- Answer ‘Y’ to disallow root login remotely.
- Answer ‘Y’ to remove the test database.
- Answer ‘Y’ to reload privilege tables.

By default, MySQL on Ubuntu does not require a password for the root user. Instead, it uses auth_socket authentication.
What is auth_socket?
auth_socketallows system users to log in to MySQL without using a password.- It checks if the Linux user running the
mysqlcommand matches a MySQL user. - This means that only the
rootLinux user can log in as the MySQLrootuser.
Change MySQL Authentication for PHP Compatibility
Log in to the MySQL console as root user using following command.
sudo mysql -u root -pAlter the root database user to use a new strong password.
ALTER USER 'root'@'localhost' IDENTIFIED WITH mysql_native_password BY 'your_password';- Note: ‘your_password’ change with your own password.
Flush the MySQL privileges table to apply the new user changes.
FLUSH PRIVILEGES;Exit from MySQL console :
exit;
Step #3:Configure MySQL Database for Voting web app on Ubuntu 24.04 LTS
In this step, we will create a MySQL database, define a table for storing votes, and insert initial data.
Log in to MySQL console again as root user and enter the password you set earlier when prompted:
sudo mysql -u root -pCreate Database with name voting_db:
CREATE DATABASE voting_db;
Select Database to Use:
USE voting_db;
Create Table with name ‘votes’ within the voting_db database:
CREATE TABLE votes (
    id INT AUTO_INCREMENT PRIMARY KEY,
    option_name VARCHAR(255) NOT NULL,
    vote_count INT DEFAULT 0
);
Insert Data into votes table :
This inserts three rows into the votes table, each corresponding to a different voting option (Option A, Option B, Option C), each initialized with a vote count of 0
INSERT INTO votes (option_name, vote_count) VALUES
('Option A', 0),
('Option B', 0),
('Option C', 0);
Exit from MySQL console.
exit
Step #4:Install PHP 8 on Ubuntu 24.04 LTS
Install PHP and modules for PHP to interact with Apache web server and MySQL database server.
sudo apt install php libapache2-mod-php php-mysql -y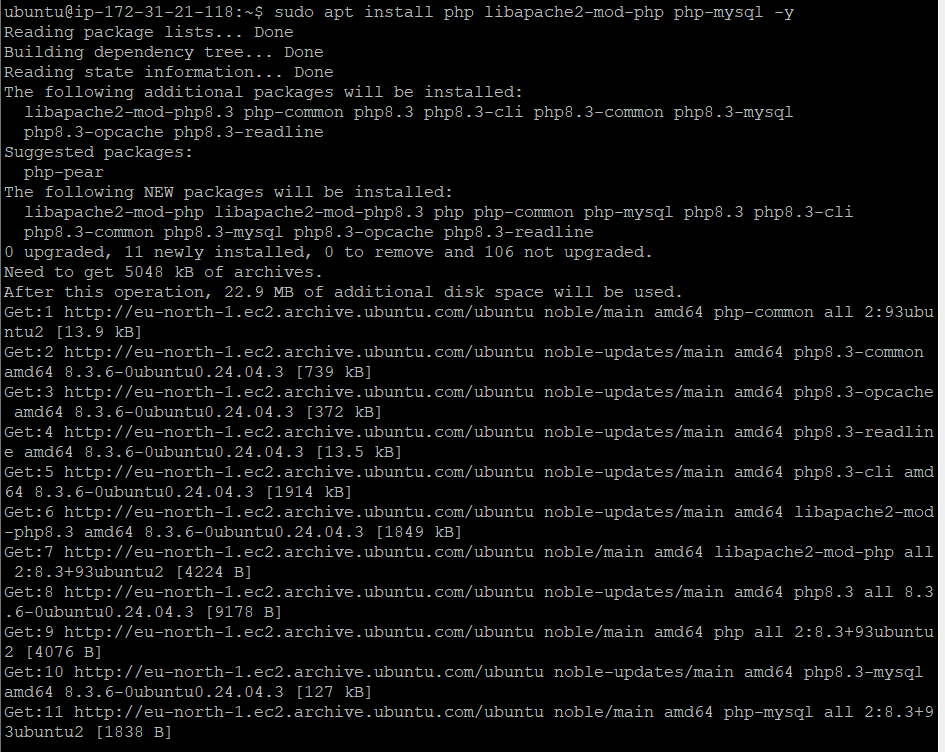
Verify the PHP installation.
php -v

Step #5:Test PHP Installation on Ubuntu 24.04 LTS
Create an info.php file in the Apache web root directory to test PHP.
sudo nano /var/www/html/info.php
Add the following content into info.php file
<?php
phpinfo();
?>
The above application code displays information about the PHP version and installed modules on your server when accessed in a web browser.

Save and exit the file.
Visit http://Public IP address/info.php in your browser to see the PHP configuration page.

Step #6:Create the Frontend code for Voting Web App on Ubuntu 24.04 LTS.
Now our database is set up, we will create a frontend using HTML, JavaScript, and jQuery for voting web app updates in LAMP stack.
Create the vote.html file in the Apache web directory root for real-time updates.
sudo nano /var/www/html/vote.htmlAdd the following HTML & JavaScript code into vote.html file.
<!DOCTYPE html>
<html lang="en">
<head>
    <meta charset="UTF-8">
    <title>Live Voting System</title>
    <script src="https://code.jquery.com/jquery-3.6.0.min.js"></script>
</head>
<body>
    <h2>Vote for an Option</h2>
    <button onclick="vote('Option A')">Vote for Option A</button>
    <button onclick="vote('Option B')">Vote for Option B</button>
    <button onclick="vote('Option C')">Vote for Option C</button>

    <h2>Live Results</h2>
    <ul id="results"></ul>

    <button onclick="resetVotes()">Reset Votes</button>

    <script>
        function vote(option) {
            $.post("vote.php", { option: option }, function(data) {
                updateResults(JSON.parse(data));
            });
        }

        function updateResults(votes) {
            $("#results").empty();
            votes.forEach(function(vote) {
                $("#results").append("<li>" + vote.option_name + ": " + vote.vote_count + "</li>");
            });
        }

        function resetVotes() {
            $.get("vote.php?reset=true", function() {
                fetchResults();
            });
        }

        function fetchResults() {
            $.getJSON("vote.php", function(data) {
                updateResults(data);
            });
        }

        setInterval(fetchResults, 2000);
        fetchResults();
    </script>
</body>
</html>
Save and exit (CTRL+X, then Y, then ENTER).

Step #7:Create Backend code (PHP) for Voting Web App on Ubuntu 24.04 LTS
Create the vote.php file in the web root to handle voting logic.
sudo nano /var/www/html/vote.phpAdd the following PHP code into vote.php file.
<?php
$servername = "localhost";
$username = "root";
$password = "Str0ngP@ssw0rd!";
$dbname = "voting_db";

$conn = new mysqli($servername, $username, $password, $dbname);

if ($conn->connect_error) {
    die("Connection failed: " . $conn->connect_error);
}

if ($_SERVER["REQUEST_METHOD"] == "POST" && isset($_POST['option'])) {
    $option = $_POST['option'];
    $stmt = $conn->prepare("UPDATE votes SET vote_count = vote_count + 1 WHERE option_name = ?");
    $stmt->bind_param("s", $option);
    $stmt->execute();
}

if (isset($_GET['reset']) && $_GET['reset'] == 'true') {
    $conn->query("UPDATE votes SET vote_count = 0");
    echo json_encode(["message" => "Votes have been reset."]);
    exit;
}

$result = $conn->query("SELECT * FROM votes");
$votes = [];
while ($row = $result->fetch_assoc()) {
    $votes[] = $row;
}

echo json_encode($votes);
$conn->close();
?>
Save and exit (CTRL+X, then Y, then ENTER).

Restart Apache server for Changes to Take Effect on Ubuntu 24.04 LTS.
sudo systemctl restart apache2Step #8:Test the Voting Web App on Ubuntu 24.04 LTS
Open your browser and visit using your public_server_ip :
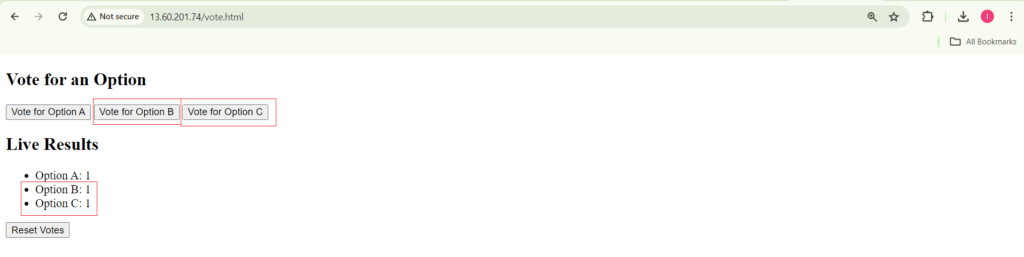
http://your-public_server-ip/vote.htmlClick on any vote button. The page should update the results automatically in every 2 seconds.

Suppose you click on Vote for Option A then in Live Results the vote count for Option A get changed from 0 to 1.

After clicking “Vote for Option A,” you can manually check the database to confirm that the count is updated.
Open MySQL in the Terminal
sudo mysql -u root -pEnter the password you set earlier when prompted:
Select the Database
USE voting_db;Check the votes table by running the following command:
SELECT * FROM votes;

vote_count for Option A is updated from 0 to 1.
Now, we click on Vote for Option B button and Vote for Option C button then Verify the updated count.
After verifying in browser you can manually check the database to confirm that the count is updated for Vote for Option B button and Vote for Option C button.
Execute query in MySQL terminal.
SELECT * FROM votes;
Now, vote_count for Option B and Option C is also updated from 0 to 1.
If you click on Reset Votes button then all vote count is get set to “0”.
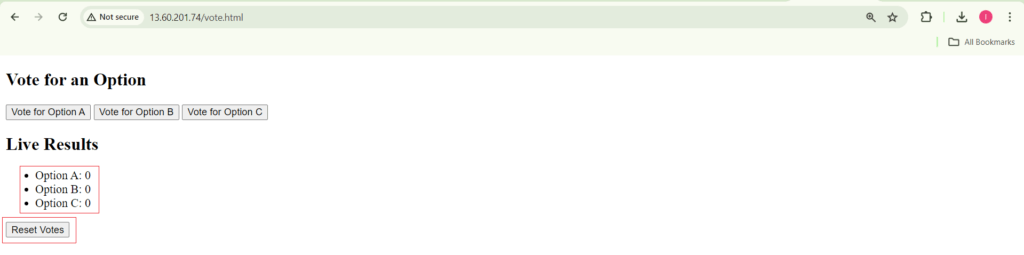
After verifying in browser you can manually check the database to confirm that the vote count is set to “0” or not.
Execute query one more time in MySQL terminal.
SELECT * FROM votes;
vote_count for Option A, Option B and Option C is updated from 1 to 0.
Exit from MySQL shell:
exitConclusion:
In this guide, we successfully built a voting web app on Ubuntu 24.04 LTS using the LAMP stack (Linux, Apache, MySQL, PHP) along with AJAX and jQuery for real-time updates. By following this guide, you have built a fully functional, voting web app in LAMP stack that dynamically updates vote counts without requiring a page refresh and also updated in your database.
Related Articles:
How to Install MySQL 5.7 on Amazon Linux 2
Reference: