In this article we are going cover use of helm template file ‘_helper.tpl’ with example. The _helpers.tpl file in Helm is a powerful tool designed to assist in the customization and organization of Helm charts. It contains reusable templates, helper functions, and shared values. This file allows you to define common logic and configurations, making your charts more modular and maintainable.
Table of Contents
Prerequisites
- AWS Account with Ubuntu 22.04 LTS EC2 Instance
- Minikube and kubectl Installed
Install Minikube and kubectl by following the official documentation for your operating system:
Install Minikube on Ubuntu 22.04 LTS
- Helm Installed:
Install Helm by following the official documentation:
Purpose of _helpers.tpl in helm chart
- The primary purpose of the
_helpers.tplfile in Helm is to serve as a centralized utility for code reuse and configuration management. It allows developers to define reusable YAML snippets, enabling the creation of standardized configurations across a Helm chart. - Additionally, it facilitates the encapsulation of helper functions, providing a means to streamline repetitive tasks and enhance the modularity of the chart.
_helpers.tplallows for the setting of default values for variables, ensuring consistent and sensible configurations while allowing flexibility for users to customize as needed. In essence, the file plays a pivotal role in maintaining code clarity, reducing redundancy, and promoting best practices in Helm chart development.
Example:
First create a chart. You can any name to your chart.
helm create mychart
Open the mychart directory using following command.
cd mychartopen the values.yaml file.
nano values.yamlthen add the ‘envVariables’ section below the service section into it.
service:
  type: ClusterIP
  port: 80

envVariables:
  - name: DB_HOST
    value: localhost
  - name: DB_PORT
    value: "3306"
to save the modification press ctrl+x, shift+y and enter.
then open the templates directory
cd templatesopen _helpers.tpl file and define the envVariables in it.
nano _helpers.tpl{{/* Define custom selector labels */}}
{{- define "mychart.selectorLabels" -}}
selectorLabel1: value1
selectorLabel2: value2
{{- end -}}
{{/* Define helper function for environment variables */}}
{{- define "mychart.envVariables" -}}
{{- range .Values.envVariables }}
- name: {{ .name }}
value: {{ .value | quote }}
{{- end }}
{{- end }}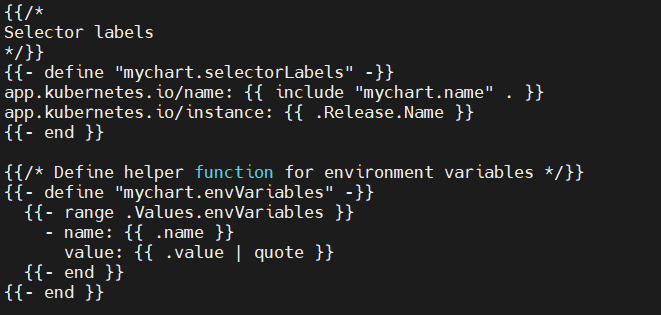
to save the modification press ctrl+x, shift+y and enter.
then open the deployment.yaml file.
nano deployment.yamladd the envVariable in it into a container block
      containers:
        - name: {{ .Chart.Name }}
          image: "{{ .Values.image.repository }}:{{ .Values.image.tag }}"
          ports:
            - containerPort: {{ .Values.service.port }}
          env:{{- range .Values.envVariables }}
            - name: {{ .name }}
              value: {{ .value | quote }}
          {{- end }}
          livenessProbe:
            httpGet:
              path: /
              port: http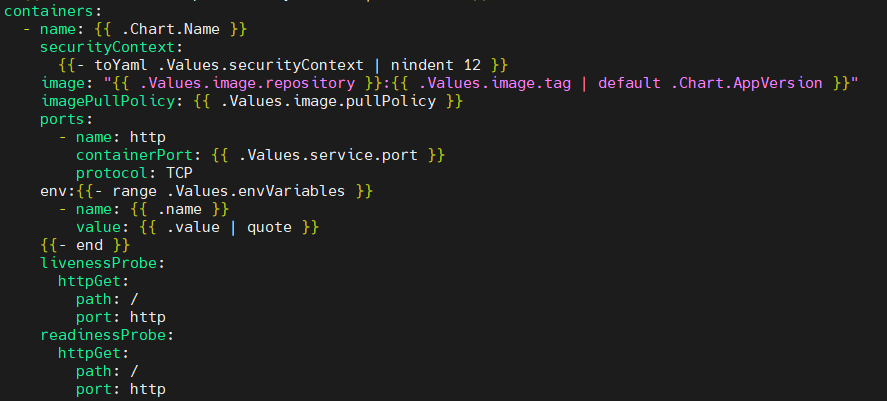
to save the modification press ctrl+x, shift+y and enter.
now exit the directories
cdRun the helm template command.
helm template mychartOutput:
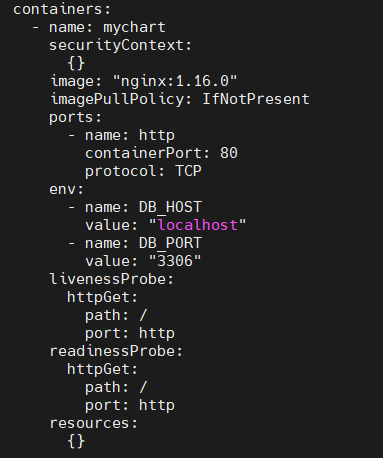
As you can see the env block is generated by the mychart.env template from helpers.tpl. It includes the DB_HOST and DB_PORT environment variables defined in values.yaml. The output demonstrates how Helm processes the templates and values to generate Kubernetes manifest files
In this example:
helpers.tpldefines a template named “mychart.env” that generates theenvblock based on the environment variables specified invalues.yaml.deployment.yamlincludes this template using{{- include "mychart.env" . }}.values.yamlcontains the environment variables (DB_HOSTandDB_PORTin this case).
Lets see another example,
Create a helm chart,
helm create nodeappopen the nodeapp directory
cd nodeappopen the values.yaml file
nano values.yamlmodify it as shown below
name: devopshint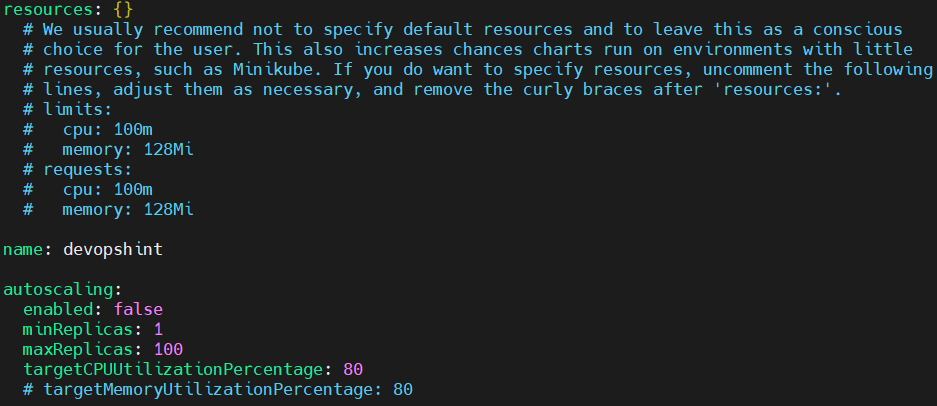
to save the modification press ctrl+x, shift+y and enter.
now open the templates directory
cd templatesmodify the _helpers.tpl using following command
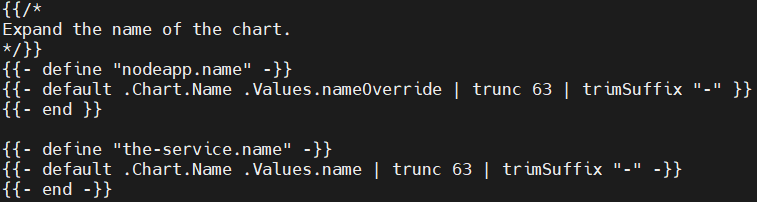
nano _helpers.tpl{{/*
Expand the name of the chart.
*/}}
{{- define "nodeapp.name" -}}
{{- default .Chart.Name .Values.nameOverride | trunc 63 | trimSuffix "-" }}
{{- end }}
{{- define "the-service.name" -}}
{{- default .Chart.Name .Values.name | trunc 63 | trimSuffix "-" -}}
{{- end -}}
to save the modification press ctrl+x, shift+y and enter.
Now modify the deployment.yaml file using following command.
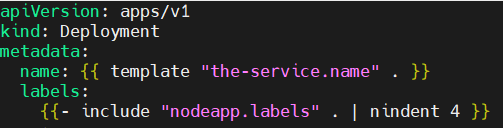
nano deployment.yamlapiVersion: apps/v1
kind: Deployment
metadata:
name: {{ template "the-service.name" . }}
labels:
{{- include "nodeapp.labels" . | nindent 4 }}
to save the modification press ctrl+x, shift+y and enter.
now exit the directories
cdrun the helm template command
helm template nodeappOutput:
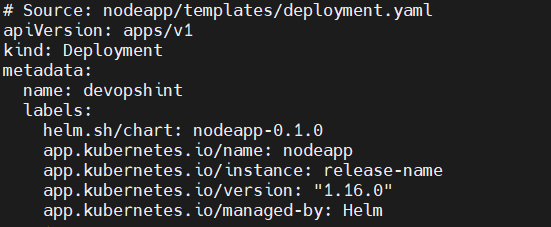
The overall purpose of this template is to create a dynamically generated service name based on certain conditions. It provides flexibility for users to either accept the default chart name or specify a custom name in their values.yaml file. The resulting name is then adjusted to meet Kubernetes naming requirements.
Troubleshooting and Pitfalls of _helpers.tpl
When working with the _helpers.tpl file in Helm, it’s important to be aware of potential troubleshooting scenarios and common pitfalls that developers may encounter.
- One common issue is the misplacement of the
_helpers.tplfile within the chart directory. Ensure that it resides in the correct location for Helm to recognize and process it. - Another potential pitfall involves naming conflicts. Since the
_helpers.tplfile is shared across various templates, it’s crucial to use unique names for functions and variables to avoid unintended overwrites or clashes. - Furthermore, if helper functions are not properly defined or if there are syntax errors within the
_helpers.tplfile, it may lead to issues during chart rendering. Regularly review and test the contents of the file to catch and address such errors early in the development process. - Additionally, when setting default values for variables, be mindful of potential conflicts with user-provided values. Helm allows users to override default values, so it’s essential to design default configurations that gracefully accommodate user customization without causing unintended side effects.
- In troubleshooting, inspecting Helm’s debug output can provide valuable insights into potential issues within the
_helpers.tplfile. Enabling Helm’s debug mode (--debugflag) helps developers trace and diagnose problems effectively.
Use Cases of _helpers.tpl in helm chart
- Standardized Labels:
- Define standardized labels for Kubernetes resources in
_helpers.tpl. - Ensure consistency across your Helm chart, making it easier to identify and manage resources.
- Define standardized labels for Kubernetes resources in
- Default Resource Requests:
- Set default resource requests and limits for containers in
_helpers.tpl. - Improve the out-of-the-box performance of your Helm chart with sensible resource configurations.
- Set default resource requests and limits for containers in
- Centralized Namespace Handling:
- Centralize namespace handling logic in
_helpers.tpl. - Streamline deployment to different namespaces by managing namespace-related configurations in one place.
- Centralize namespace handling logic in
- Reusable Annotations:
- Create reusable annotations for Kubernetes resources using
_helpers.tpl. - Promote consistency by applying common annotations to various resources without duplicating code.
- Create reusable annotations for Kubernetes resources using
Best Practices of _helpers.tpl in helm chart
- Clear Naming:
- Use clear and straightforward names for variables and functions in the
_helpers.tplfile. - Opt for names that directly convey their purpose to make the code easy to understand.
- Use clear and straightforward names for variables and functions in the
- Concise Comments:
- Add concise comments to explain the purpose of each section, variable, or function.
- Keep comments up-to-date with any changes to ensure they remain helpful.
- Logical Organization:
- Organize the
_helpers.tplfile logically, grouping related functions and variables together. - Create separate sections for snippets, functions, and default values for easy navigation.
- Organize the
- Consistent Formatting:
- Maintain consistent formatting, such as indentation and spacing, throughout the file.
- Consistency enhances readability and makes the code visually cohesive.
- Documentation Reference:
- If there’s extensive documentation for the Helm chart, include a reference or link in the
_helpers.tplfile. - This helps developers quickly find more detailed information about the chart’s structure and behavior.
- If there’s extensive documentation for the Helm chart, include a reference or link in the
Conclusion
In conclusion, the _helpers.tpl file in Helm proves to be a valuable asset for enhancing the efficiency and maintainability of Helm charts. By allowing developers to create reusable snippets, define helper functions, and set default values for variables, this utility file promotes a modular and standardized approach to Kubernetes deployments. As a central hub for code reuse and configuration management, _helpers.tpl is an essential tool for Helm chart creators seeking to optimize their workflows and build robust, scalable applications.
Related Articles: