In this article, we are going to cover Use of Flow Control Statements in Helm with Example | flow control structures of helm if, with, and range, in Helm templates.. We’ll focus on its templating system, using simple ‘if,’ ‘with,’ and ‘range’ statements to make Kubernetes setups flexible. These constructs allow for dynamic and conditional customization of Kubernetes resources.
Table of Contents
Prerequisites
- AWS Account with Ubuntu 22.04 LTS EC2 Instance
- Minikube and kubectl Installed
Install Minikube and kubectl by following the official documentation for your operating system:
Install Minikube on Ubuntu 22.04 LTS
- Helm Installed:
Install Helm by following the official documentation:
Use of if Statement in Helm with Example
The if statement in Helm’s templating language allows for conditional logic. It evaluates a condition and includes or excludes specific sections of YAML based on the result. The condition is typically expressed using comparison or equality operators. It checks a condition and executes a block of code if the condition is true.
- The
ifstatement can be chained withelse ifandelsefor handling multiple conditions. - Common comparison operators include
eq,ne,lt,le,gt,ge.
Syntax:
{{- if condition }}
  # Code to execute if the condition is true
{{- else if anotherCondition }}
  # Code to execute if another condition is true
{{- else }}
  # Code to execute if none of the conditions are true
{{- end }}- ‘
{{-‘ and ‘-}}‘ are used for trimming whitespaces. ifis followed by the condition to be evaluated.else ifandelseare optional, providing additional branches for different conditions.
A condition is evaluated as false if the value is:
- a boolean false
- a numeric zero
- an empty string
- a
nil(empty or null) - an empty collection (
map,slice,tuple,dict,array)
Example:
first we will create a chart named ‘helloworld’.
helm create helloworldthen open the directory in which values.yaml file is present.
cd helloworldnow lets modify values file. use the following command to modify in it.
nano values.yamlmodify it as shown below.
repicaCount: 3envVars:
enabled: false # Change to true to enable envVars
valueOne: "first_value"
valueTwo: "second_value" 
to save the modification press ctrl+x, shift+y and enter.
then we will modify the deployment.yaml file,
first open the directory in which the file present,
cd templatesthen use following command to modify in deployment.yaml
nano deployment.yamlnow modify the part as shown in below image. Here env section is added using if statement inside the container section.
{{- if .Values.envVars.enabled }}
env:
    - name: ENV_VAR_ONE
      value: {{ .Values.envVars.valueOne | quote }}
    - name: ENV_VAR_TWO
      value: {{ .Values.envVars.valueTwo | quote }}
{{- else }}
env:
    - name: ENV_VAR_DEFAULT
      value: "default_value"
{{- end }}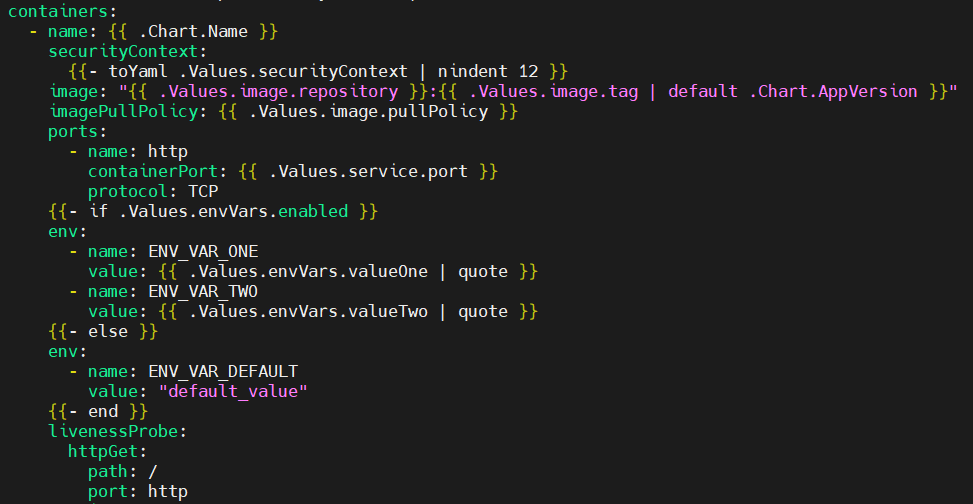
to save the modification press ctrl+x, shift+y and enter.
In this example:
- The
.Values.envVars.enabledchecks ifenvVarsis enabled in the Helm values file. - If it’s set to
true, it includes theenvsection with the specified environment variables. - If it’s set to
falseor not defined, it includes a default environment variable (ENV_VAR_DEFAULT) with a default value.
now exit the directory using following command.
cdrun the template command to see if modifications are done.
helm template helloworldOutput:
# Source: helloworld/templates/deployment.yaml

apiVersion: apps/v1
kind: Deployment
metadata:
name: release-name-helloworld
labels:
helm.sh/chart: helloworld-0.1.0
app.kubernetes.io/name: helloworld
app.kubernetes.io/instance: release-name
app.kubernetes.io/version: "1.16.0"
app.kubernetes.io/managed-by: Helm
spec:
replicas: 3
selector:
matchLabels:
app.kubernetes.io/name: helloworld
app.kubernetes.io/instance: release-name
template:
metadata:
labels:
helm.sh/chart: helloworld-0.1.0
app.kubernetes.io/name: helloworld
app.kubernetes.io/instance: release-name
app.kubernetes.io/version: "1.16.0"
app.kubernetes.io/managed-by: Helm
spec:
serviceAccountName: release-name-helloworld
securityContext:
{}
containers:
- name: helloworld
securityContext:
{}
image: "nginx:1.16.0"
imagePullPolicy: IfNotPresent
ports:
- name: http
containerPort: 80
protocol: TCP
env:
- name: ENV_VAR_DEFAULT
value: "default_value"
livenessProbe:
httpGet:
path: /
port: http
readinessProbe:
httpGet:
path: /
port: http
resources:
{}
Since, envVars is set to enabled: false so instead of first_value and second_value, default value is printed.
Now lets change the enabled: false to true. Follow the same procedure to modify values.yaml file and set the envVars to enabled:true
envVars:
    enabled: true    # Change to true to enable envVars
    valueOne: "first_value"
    valueTwo: "second_value"
Now run the helm template helloworld command again.
Output:
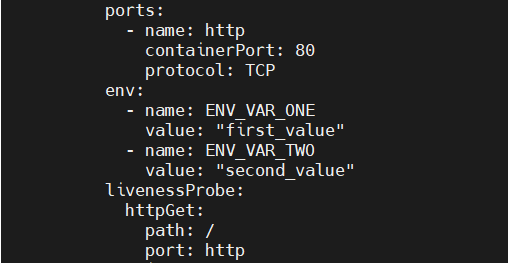
as you can see in env section printed the name and value of first and second variable.
Use of with Statement in Helm with example:
The with statement simplifies referencing nested structures in Helm templates. It sets a context for a block of code, reducing redundancy and improving code readability. This is particularly handy when dealing with complex configurations and nested values within the Helm chart.
- The
withstatement sets the context for the block, allowing direct access to the fields within.Values. - Useful when dealing with nested structures to avoid repetitive references.
- The
.(dot) is a special identifier in Helm that represents the current context or scope. When used withwith, it allows you to reference values from the current context within the new scope.
Syntax:
{{- with context }}
  # Code to execute within the specified context
{{- end }}
- ‘
{{-‘ and ‘-}}‘ trim whitespaces. withis followed by the context or variable, setting the scope for the enclosed block of code.
Example:
Follow the same procedure mentioned above till modifying values.yaml.
add the envVariables part in values.yaml file.
service:
  type: ClusterIP
  port: 80

envVariables:
  - name: DATABASE_URL
    value: "your-database-url"
  - name: API_KEY
    value: "your-api-key"
  - name: DEBUG_MODE
    value: "true"

ingress:
  enabled: false
  className: ""
  annotations: {}
    # kubernetes.io/ingress.class: nginx
    # kubernetes.io/tls-acme: "true"
  hosts:
    - host: chart-example.local
      paths:
        - path: /
          pathType: ImplementationSpecific
to save the modification press ctrl+x, shift+y and enter.
then open the templates directory and modify the deployment.yaml file
cd templatesnano deployment.yamlWe will use ‘with’ at container block after port part.
      containers:
        - name: {{ .Chart.Name }}
          securityContext:
            {{- toYaml .Values.securityContext | nindent 12 }}
          image: "{{ .Values.image.repository }}:{{ .Values.image.tag | default .Chart.AppVersion }}"
          imagePullPolicy: {{ .Values.image.pullPolicy }}
          ports:
            - name: http
              containerPort: {{ .Values.service.port }}
              protocol: TCP
          {{- with .Values.envVariables }}
          env:
            {{- range . }}
            - name: {{ .name }}
              value: {{ .value | quote }}
            {{- end }}
          {{- end }}
          livenessProbe:
            httpGet:
              path: /
              port: http
to save the modification press ctrl+x, shift+y and enter.
exit the directories.
cdthen run the helm template command
helm template helloworldOutput:
# Source: helloworld/templates/deployment.yaml
apiVersion: apps/v1
kind: Deployment
metadata:
  name: release-name-helloworld
  labels:
    helm.sh/chart: helloworld-0.1.0
    app.kubernetes.io/name: helloworld
    app.kubernetes.io/instance: release-name
    app.kubernetes.io/version: "1.16.0"
    app.kubernetes.io/managed-by: Helm
spec:
  replicas: 1
  selector:
    matchLabels:
      app.kubernetes.io/name: helloworld
      app.kubernetes.io/instance: release-name
  template:
    metadata:
      labels:
        helm.sh/chart: helloworld-0.1.0
        app.kubernetes.io/name: helloworld
        app.kubernetes.io/instance: release-name
        app.kubernetes.io/version: "1.16.0"
        app.kubernetes.io/managed-by: Helm
    spec:
      serviceAccountName: release-name-helloworld
      securityContext:
        {}
      containers:
        - name: helloworld
          securityContext:
            {}
          image: "nginx:1.16.0"
          imagePullPolicy: IfNotPresent
          ports:
            - name: http
              containerPort: 80
              protocol: TCP
          env:
            - name: DATABASE_URL
              value: "your-database-url"
            - name: API_KEY
              value: "your-api-key"
            - name: DEBUG_MODE
              value: "true"
          livenessProbe:
            httpGet:
              path: /
              port: http
          readinessProbe:
            httpGet:
              path: /
              port: http
          resources:
            {}
To align your Helm values file with the modified deployment.yaml using the with statement, you need to structure your values file accordingly.
Use of range Statement with example:
The range statement enables iteration over lists or maps in Helm templates. It’s a powerful tool for dynamically generating Kubernetes resources based on a list of values. This feature is crucial for creating scalable charts that can adapt to varying numbers of components or services.
- The
rangestatement iterates over the list or map provided. - It is valuable when generating resources dynamically based on input values.
Syntax:
{{- range iterable }}
  # Code to execute for each item in the iterable
{{- end }}
- ‘
{{-‘ and ‘-}}‘ trim whitespaces. rangeis followed by the iterable (e.g., a list or map).- The block of code inside the
rangeis executed for each item in the iterable.
Example:
Follow the same steps as if statement until modifying values.yaml file
Modify the values file using following command.
nano values.yamladd the envVariable section in it.
envVariables:
    - name: DB_HOST
      value: "localhost"
    - name: DB_PORT
      value: "5432"
    - name: DB_KEY
      value: "secret_key"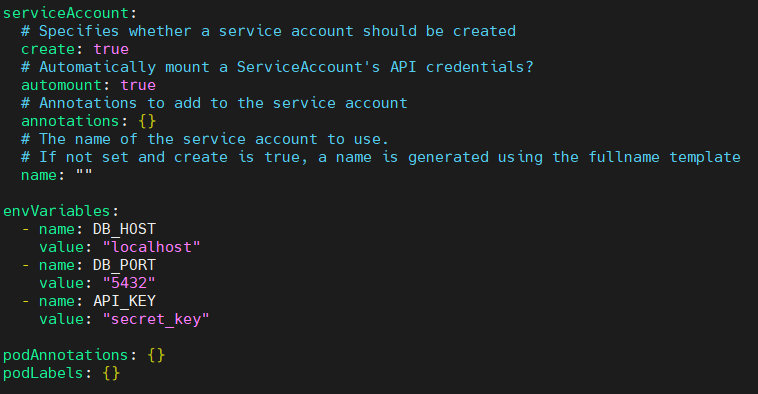
to save the modification press ctrl+x, shift+y and enter.
Now open the templates directory
cd templatesThen modify the deployment.yaml file.
nano deployment.yamladd env section in container section as shown below.
env:
  {{- range .Values.envVariables }}
  - name: {{ .name }}
    value: {{ .value | quote }}
  {{- end }}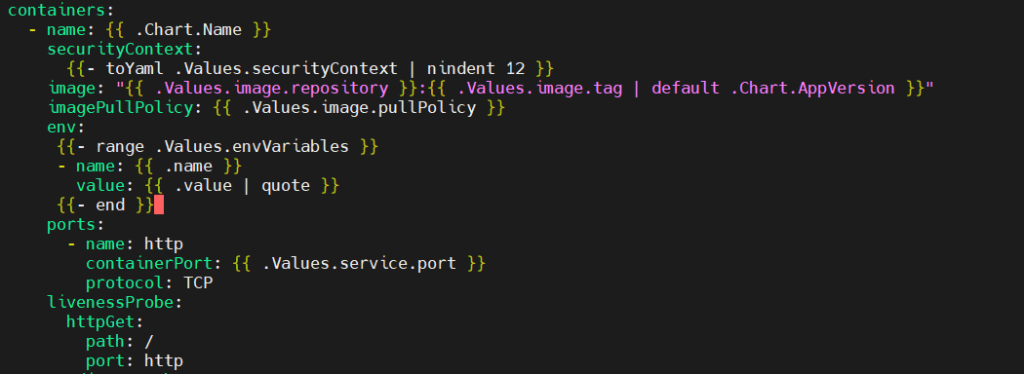
to save the modification press ctrl+x, shift+y and enter.
exit the directories.
cdRun the helm template command.
helm template helloworldOutput:
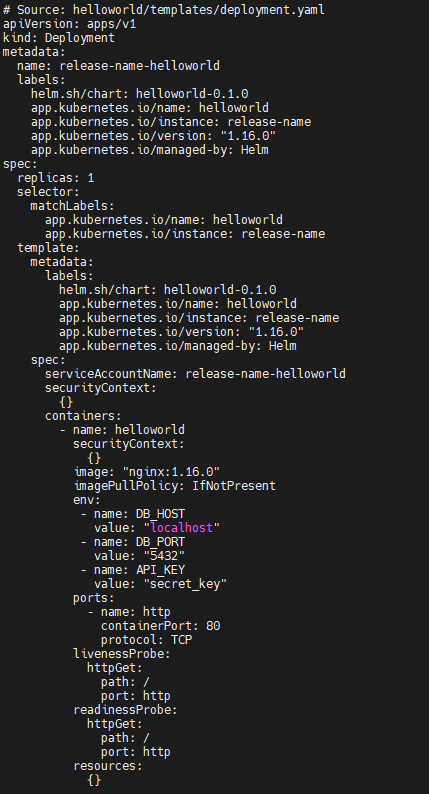
You can see the env section in the output is printed.
- The
rangestatement is used to iterate over the list of environment variables defined in.Values.envVariables. - For each variable in the list, a new block is created in the
spec.template.spec.containers.envsection of theDeployment. - The template within the
rangeblock accesses properties of each environment variable such asnameandvalue.
Importance Flow Control Statements in Helm
The importance of flow controls (if, with, and range) in Helm cannot be overstated. Here are key reasons why they are crucial in Helm:
- Dynamic Configurations:
ifstatements enable conditional adjustments, allowing dynamic configurations based on different environments.
- Reduced Redundancy with
with:- The
withstatement simplifies referencing nested structures, reducing redundancy and enhancing code readability.
- The
- Iterative Resource Generation with
range:rangestatements facilitate the dynamic creation of resources, essential for scalable and adaptable Helm charts.
- Adaptability and Readability:
- Helm flow controls enhance adaptability by adjusting configurations, promoting modularity, and making charts more readable in diverse deployment scenarios.
Best Practices of Flow Control Statements in Helm
Here are the main best practices for using flow controls in Helm charts:
- Whitespace Trimming:
- Use ‘
{{-‘ and ‘-}}‘ to trim unnecessary whitespaces, ensuring cleaner YAML output.
- Use ‘
- Consistent Indentation:
- Maintain consistent indentation for a well-organized and readable code structure.
- Commenting:
- Add comments to explain the purpose of flow controls and any complex logic for better understanding.
- Use Helper Functions for Complex Logic:
- Consider moving intricate or reusable logic to helper functions in
helpers.tplto keep main templates focused.
- Consider moving intricate or reusable logic to helper functions in
- Avoid Nested Flow Controls When Possible:
- Limit the depth of nested flow controls to maintain simplicity and ease of management.
- Error Handling:
- Use
{{- fail "message" }}inifstatements for explicit error handling to avoid silent failures.
- Use
- Group Related Logic:
- Group related logic together to improve clarity and separate different concerns into distinct sections.
- Avoid Hardcoding Values:
- Refrain from hardcoding values directly within templates; rely on values from
values.yamlor external configurations.
- Refrain from hardcoding values directly within templates; rely on values from
- Testing and Validation:
- Implement thorough testing of Helm charts, including scenarios involving different flow control paths.
- Documentation:
- Maintain documentation outlining the purpose and usage of flow controls within Helm charts.
These practices collectively contribute to creating maintainable, readable, and error-resistant Helm charts with effective use of flow controls.
Conclusion:
In conclusion, Use of Flow Control Statements in Helm with Example | using Helm charts with flow controls like if, with, and range involves keeping things tidy, using helper functions smartly, and simplifying without making it too complicated. It’s about organizing, testing, and documenting for practical use in different situations. It ensures that your Helm charts are well-structured, adaptable, and straightforward for seamless use in diverse environments.
Related Articles:
How to use helm lint, helm –debug –dry-run and helm template