In this article we are going to cover Pull Image from DockerHub Private Registry using Helm in Kubernetes.
Containerization has become a cornerstone in modern application development and deployment. Docker containers, for instance, encapsulate an application and its dependencies, ensuring consistency across various environments. To manage these containers efficiently, many organizations use container orchestration tools like Kubernetes, and to simplify deployment, Helm charts provide a powerful abstraction.
In this article, we’ll explore how to pull images from a private registry using YAML and Helm. Private registries are essential for secure and controlled access to container images, and configuring Helm charts to fetch images from these private repositories is a common requirement.
Table of Contents
Prerequisites
- AWS Account with Ubuntu 22.04 LTS EC2 Instance
- A private container registry in DockerHub
- Minikube and kubectl, Helm Installed
Install Minikube and kubectl by following the official documentation for your operating system:
Install Minikube on Ubuntu 22.04 LTS
- Helm Installed:
Install Helm by following the official documentation:
Push an Image in private registry
First create an image then push it in private Docker hub registry.
Here are some basic components to build a Docker image.
- Dockerfile
- Application Code
- Dependencies and Configuration Files
Step #1:Dockerizing a Node.js web app
First create a folder named express_app and move inside the folder using the following commands.
mkdir express_app
cd express_app
Step #2:Create the Node.js app
Then create a file named package.json which consist all files and dependencies required to describe the app.
nano package.jsonadd the following content into it.
{
  "name": "docker-example",
  "version": "1.0.0",
  "description": "",
  "main": "app.js",
  "scripts": {
    "start": "nodemon app.js",
    "test": "echo \"Error: no test specified\" && exit 1"
  },
  "author": "",
  "license": "ISC",
  "dependencies": {
    "express": "^4.17.1",
    "nodemon": "^2.0.12"
  }
}

save the modification using ctrl+x, shift+y and Enter.
install npm (Node Package Manager)
sudo apt install npmNow, initialize the node project using the following command
npm init
Output:
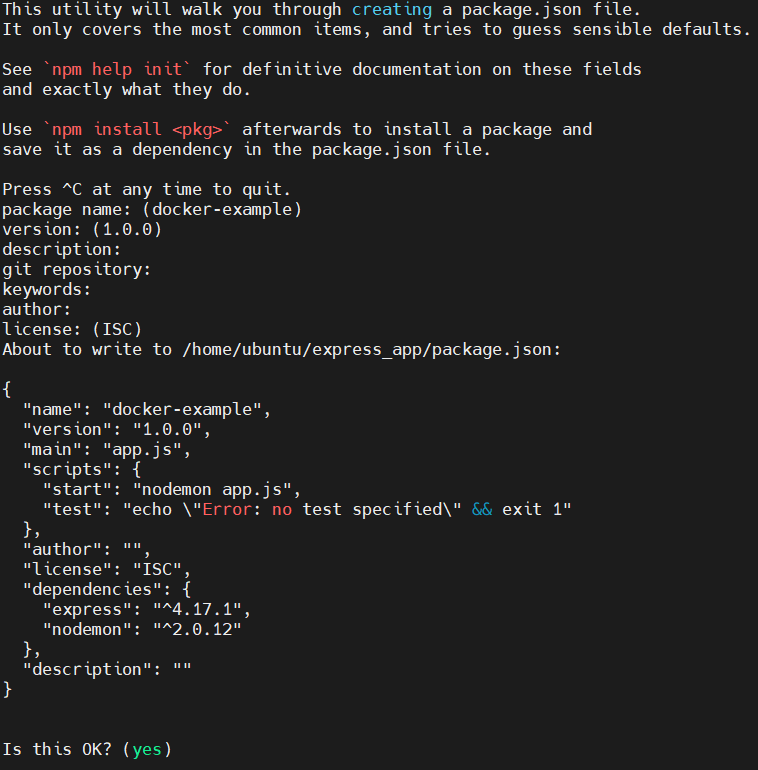
The package.json file will be added. It holds information about our projects like scripts, files, dependencies, and versions. It will ask for name, version and many other things you can just set it to default by pressing Enter.
Then install the Express library and add it to the package.json file
npm install --save express
Output:
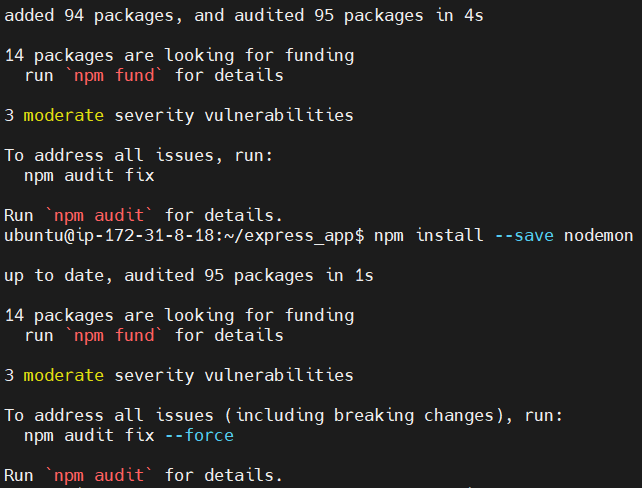
Now install a tool called nodemon. It will automatically restarts the node application when it detects any changes.
npm install --save nodemonStep #3:Create app.js file for Nodejs app
Then, create a app.js file named app.js that defines a web app using the Express.js framework.
nano app.jsadd the following content into it.
// import and create an express app
const express = require('express');
const app = express()

// message as response
msg = "Hello world! this is nodejs in a docker container.."
// create an end point of the api
app.get('/', (req, res) => res.send(msg));

// now run the application and start listening
// on port 3000
app.listen(3000, () => {
    console.log("app running on port 3000...");
})
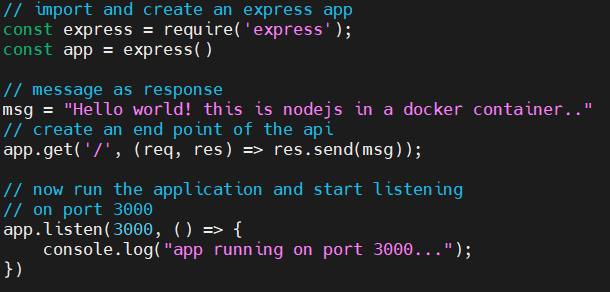
save the modification using ctrl+x, shift+y and Enter.
After this we can run the application on our local system.
npm run start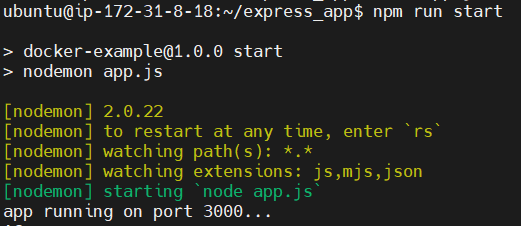
Step #4:Create a Dockerfile For Nodejs app
Now to Dockerize the application we will create an image and for that we will create a Dockerfile which holds the information about image that will run the application.
nano DockerfileFROM node:latest
WORKDIR /app
COPY package.json /app
RUN npm install
COPY . /app
CMD ["npm", "start"]
EXPOSE 3000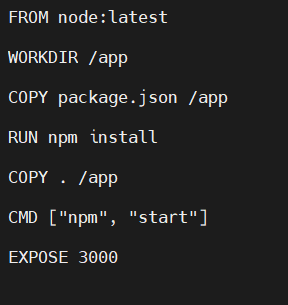
save the modification using ctrl+x, shift+y and Enter.
Step #5:Building an Image for Nodejs app
Now with the help of Dockerfile build an image using following command.
docker build -t nodeapp .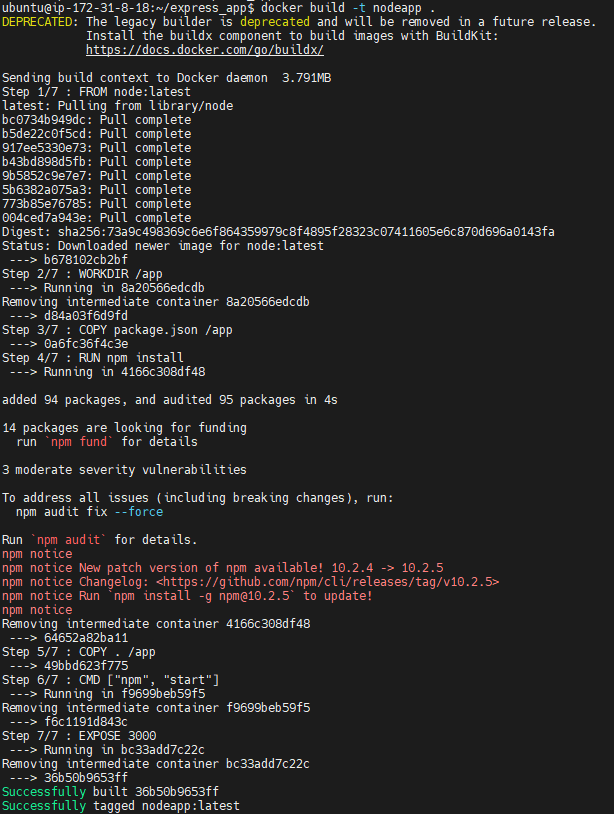
confirm the image is created by running following command.
docker imagesNow run the image as a container using following command
docker run -p 3000:3000 nodeapp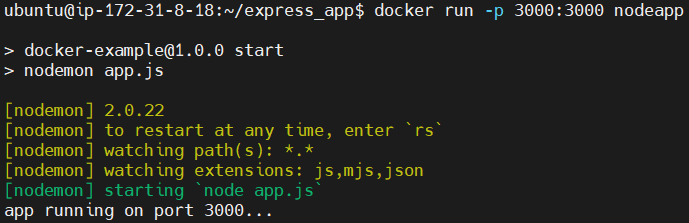
Step #6:Push the image in private registry
Login to the docker
docker loginOutput:

it will ask for username and password
then tag the image using following command.
docker tag nodeapp:latest prasadhole/nodeapp:latest
then push the image to your private registry using following command
docker push prasadhole/nodeapp:latest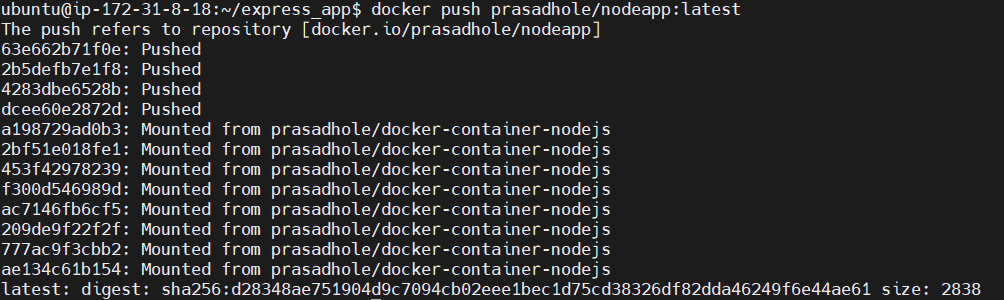
now image is pushed to the private registry named nodeapp.
Pull the image from private registry using helm file
Step #1:Create a secret for docker-registry
Create a secret Docker registry
kubectl create secret docker-registry nodeapp \
    --docker-server=https://index.docker.io/v1/ \
    --docker-username=prasadhole \
    --docker-password=Prasad@2002
Step #2:Create a helm chart for Nodejs app
Create a helm chart
helm create nodejs
If your Docker image is hosted on Docker Hub and your Docker Hub credentials are needed to pull the image during deployments in Kubernetes, you can create a secret with your Docker Hub credentials using the following kubectl create secret docker-registry command.
now open the directory
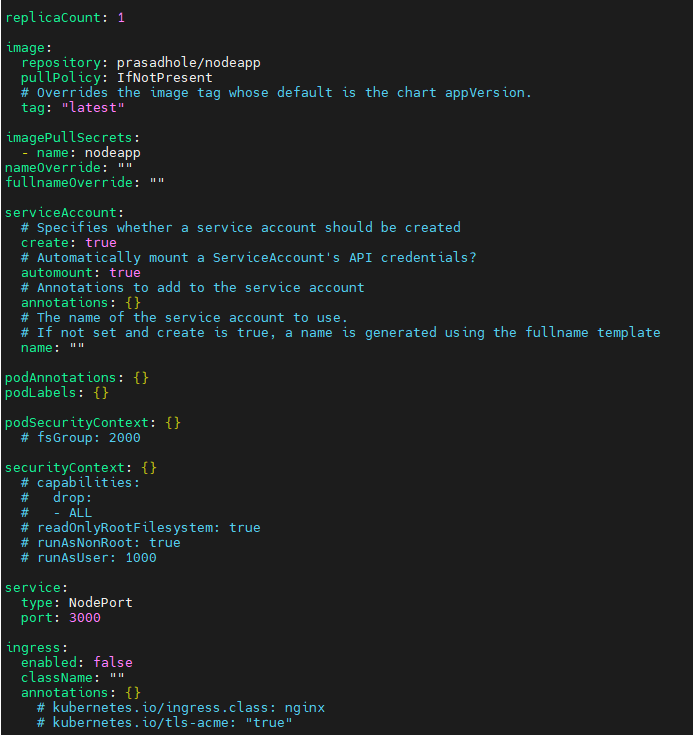
cd nodejsthen open the values.yaml file and modify it as shown below
nano values.yaml # Default values for nodejs.
# This is a YAML-formatted file.
# Declare variables to be passed into your templates.
replicaCount: 1
image:
repository: prasadhole/nodeapp
pullPolicy: IfNotPresent
# Overrides the image tag whose default is the chart appVersion.
tag: "latest"
imagePullSecrets:
- name: nodeapp
nameOverride: ""
fullnameOverride: ""
serviceAccount:
# Specifies whether a service account should be created
create: true
# Automatically mount a ServiceAccount's API credentials?
automount: true
# Annotations to add to the service account
annotations: {}
# The name of the service account to use.
# If not set and create is true, a name is generated using the fullname template
name: ""
podAnnotations: {}
podLabels: {}
podSecurityContext: {}
# fsGroup: 2000
securityContext: {}
# capabilities:
# drop:
# - ALL
# readOnlyRootFilesystem: true
# runAsNonRoot: true
# runAsUser: 1000
service:
type: NodePort
port: 3000
ingress:
enabled: false
className: ""
annotations: {}
# kubernetes.io/ingress.class: nginx
# kubernetes.io/tls-acme: "true"
hosts:
- host: chart-example.local
paths:
- path: /
pathType: ImplementationSpecific
tls: []
# - secretName: chart-example-tls
# hosts:
# - chart-example.local
resources: {}
# We usually recommend not to specify default resources and to leave this as a conscious
# choice for the user. This also increases chances charts run on environments with little
# resources, such as Minikube. If you do want to specify resources, uncomment the following
# lines, adjust them as necessary, and remove the curly braces after 'resources:'.
# limits:
# cpu: 100m
# memory: 128Mi
# requests:
# cpu: 100m
# memory: 128Mi
autoscaling:
enabled: false
minReplicas: 1
maxReplicas: 100
targetCPUUtilizationPercentage: 80
# targetMemoryUtilizationPercentage: 80
# Additional volumes on the output Deployment definition.
volumes: []
# - name: foo
# secret:
# secretName: mysecret
# optional: false
# Additional volumeMounts on the output Deployment definition.
volumeMounts: []
# - name: foo
# mountPath: "/etc/foo"
# readOnly: true
nodeSelector: {}
tolerations: []
affinity: {}
save the modification using ctrl+x, shift+y and Enter.
exit the directory
cdStep #3:Install the chart to Pull the image
now install the chart
helm install mynodeapp nodejs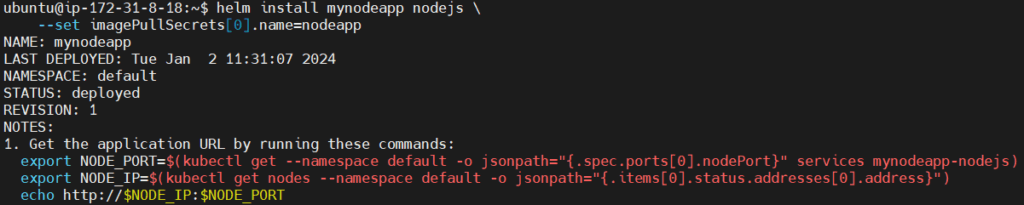
run the kubectl command check the pod is running or not
kubectl get pods
run the following command to check if image is pulled or not.
kubectl pod describe mynodeapp-nodejs-b74b7db44-c6rsr
Step #4:Run the Nodejs app on browser
For checking services, run following command
kubectl get svc
For accessing the Nodejs application on browser use following command.
kubectl port-forward --address 0.0.0.0 svc/mynodeapp-nodejs 3000:3000
This command is used to forward traffic from port 3000 on your local machine to port 3000 on the specified service mynodeapp-nodejs. This can be useful for accessing a service running in your Kubernetes cluster from your local machine.
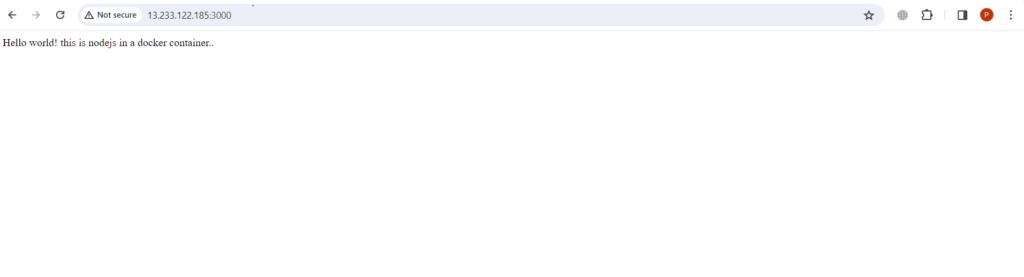
To access the application on Browser write the ip address:port number in url.
ip address is the public ip address of your Minikube EC2 instance created on AWS and port number which is 3000 which we have used in forwarding nodejs pod.
” Hello world! this is nodejs in a docker container.. ” message will be displayed as follows.
Conclusion:
Pulling images from a private registry using YAML and Helm involves creating a Kubernetes Secret for authentication and updating Helm chart values. This ensures that your Kubernetes deployments can securely access container images from private repositories, providing a robust and scalable solution for containerized applications.
Related Articles: