In this article we are going to cover How to use Helm lint, helm debug –dry-run and helm template with examples.
Helm, the Kubernetes package manager, empowers developers and operators in streamlining application deployments and managing Kubernetes resources efficiently. Among its arsenal of commands, three stand out as indispensable tools for ensuring smooth deployments and maintaining chart integrity: 'lint‘, ‘template', and '--dry-run‘
Table of Contents
Prerequisites
- AWS Account with Ubuntu 22.04 LTS EC2 Instance
- Minikube and kubectl Installed
Install Minikube and kubectl by following the official documentation for your operating system:
Install Minikube on Ubuntu 22.04 LTS
- Helm Installed:
Install Helm by following the official documentation:
helm lint command use case with Examples
The helm lint command is used to check a Helm chart for potential issues or errors. It performs a series of checks on the chart’s structure, syntax, and adherence to best practices. Here are some common use cases for using helm lint:
- Validate Chart Syntax:
helm lintchecks the syntax of your Helm chart’s files, ensuring that they are correctly formatted and follow the expected syntax. This helps catch issues such as YAML syntax errors or misplaced template directives.
- Check Chart Structure:
- The command examines the overall structure of your Helm chart to ensure that it adheres to the required conventions. It verifies the presence of necessary files and directories, such as the
Chart.yamlfile,templatesdirectory, and others.
- The command examines the overall structure of your Helm chart to ensure that it adheres to the required conventions. It verifies the presence of necessary files and directories, such as the
- Verify Template Rendering:
- Helm uses templates to generate Kubernetes manifests based on the provided values.
helm lintchecks if the templates in your chart can be rendered successfully, catching potential errors before deploying the chart to a Kubernetes cluster.
- Helm uses templates to generate Kubernetes manifests based on the provided values.
- Ensure Chart Best Practices:
- The command enforces Helm best practices and guidelines, helping you maintain a consistent and well-organized chart. It may provide warnings or errors for practices that could lead to issues during deployment.
- Prevent Common Mistakes:
helm linthelps prevent common mistakes and pitfalls by identifying issues in your Helm chart early in the development process. This includes detecting misconfigurations, missing required fields, or other problems that might cause deployment failures.
The helm lint command is used to validate your Helm charts and detect potential issues or errors before deploying them to a Kubernetes cluster.
This command takes a path to a chart and runs a series of tests to verify that the chart is well-formed.
If the linter encounters things that will cause the chart to fail installation, it will emit [ERROR] messages. If it encounters issues that break with convention or recommendation, it will emit [WARNING] messages.
To use helm lint, navigate to the directory containing your Helm chart and run the following command:
Syntax:
helm lint .- Replace
.with the path to your Helm chart if it’s in a different directory.
If there are no issues, the command will display a message indicating that the linting was successful. If there are problems, helm lint will provide information about the errors or warnings encountered.
Example:
First we will create a chart named ‘world’ using helm create command. You can give any name you want to the chart.
helm create world
Then we will use helm lint command to validate the chart.
helm lint worldFollowing output shows the successful validation of the chart.
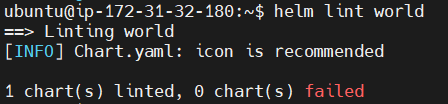
This command will analyze your chart’s files, templates, and values for any potential issues or errors. If everything is correct, you will see a message indicating that the linting was successful.
Now lets see what will happen if there is an error.
We will modify the values.yaml file,
First navigate to world directory by using following command
cd worldThen we will modify and simply delete the line 8 from values.yaml file using following command
nano values.yamlThis command will open the values.yaml on your local machine. Edit it.
After modification press ctrl + x, then shift + y and Enter.
now exit the directory using following command.
cdNow again run the helm lint command
helm lint worldIf there are errors or warnings, you will receive feedback about what needs to be fixed as shown in below image.

helm template command use case with Examples
The helm template command is used to render the Kubernetes YAML manifests from a Helm chart without installing it on a cluster. This is useful for inspecting the generated Kubernetes resources before deploying them to a cluster. Here are some common use cases for helm template:
1.Preview Manifests:
Use helm template to generate the Kubernetes YAML manifests based on the Helm chart. This allows you to inspect the resources that will be deployed to the cluster without actually applying them.
Syntax:
helm template <release-name> <chart-name> -f values.yaml2. Debugging:
When encountering issues during Helm chart deployment, you can use helm template to examine the rendered manifests. This helps in debugging and identifying any problems with the generated Kubernetes resources or values.
3. Version Control and Auditing:
Syntax:
helm template <release-name> <chart-name> -f values.yaml > output.yaml4. Customization and Overrides:
Preview the manifests with different configurations and overrides by specifying a different values file or using the --set option to dynamically change values.
Syntax:
helm template <release-name> <chart-name> --set key1=value1,key2=value25. Integration with CI/CD:
In a continuous integration/continuous deployment (CI/CD) pipeline, you might want to use helm template as a step to generate the Kubernetes manifests before applying them to the target Kubernetes cluster. This allows you to perform additional checks or validations before actual deployment.
6. Security and Compliance Checks:
Before deploying to a production environment, use helm template to inspect the generated manifests and perform security and compliance checks. This ensures that the deployed resources adhere to your organization’s policies and standards.
The helm template command takes a Helm chart as input and processes its templates, which are written in the Go template language. It replaces placeholders in the templates with actual values and generates the resulting Kubernetes manifest files.
Example:
First we will create a chart named ‘demo’ using helm create command. You can give any name you want to the chart.
helm create demo
then we will use helm template command to inspect rendered YAML.
helm template demo
Output:
# Source: demo/templates/serviceaccount.yaml
apiVersion: v1
kind: ServiceAccount
metadata:
  name: release-name-demo
  labels:
    helm.sh/chart: demo-0.1.0
    app.kubernetes.io/name: demo
    app.kubernetes.io/instance: release-name
    app.kubernetes.io/version: "1.16.0"
    app.kubernetes.io/managed-by: Helm
automountServiceAccountToken: true
---
# Source: demo/templates/service.yaml
apiVersion: v1
kind: Service
metadata:
  name: release-name-demo
  labels:
    helm.sh/chart: demo-0.1.0
    app.kubernetes.io/name: demo
    app.kubernetes.io/instance: release-name
    app.kubernetes.io/version: "1.16.0"
    app.kubernetes.io/managed-by: Helm
spec:
  type: ClusterIP
  ports:
    - port: 80
      targetPort: http
      protocol: TCP
      name: http
  selector:
    app.kubernetes.io/name: demo
    app.kubernetes.io/instance: release-name
---
# Source: demo/templates/deployment.yaml
apiVersion: apps/v1
kind: Deployment
metadata:
  name: release-name-demo
  labels:
    helm.sh/chart: demo-0.1.0
    app.kubernetes.io/name: demo
    app.kubernetes.io/instance: release-name
    app.kubernetes.io/version: "1.16.0"
    app.kubernetes.io/managed-by: Helm
spec:
  replicas: 1
  selector:
    matchLabels:
      app.kubernetes.io/name: demo
      app.kubernetes.io/instance: release-name
  template:
    metadata:
      labels:
        helm.sh/chart: demo-0.1.0
        app.kubernetes.io/name: demo
        app.kubernetes.io/instance: release-name
        app.kubernetes.io/version: "1.16.0"
        app.kubernetes.io/managed-by: Helm
    spec:
      serviceAccountName: release-name-demo
      securityContext:
        {}
      containers:
        - name: demo
          securityContext:
            {}
          image: "nginx:1.16.0"
          imagePullPolicy: IfNotPresent
          ports:
            - name: http
              containerPort: 80
              protocol: TCP
          livenessProbe:
            httpGet:
              path: /
              port: http
          readinessProbe:
            httpGet:
              path: /
              port: http
          resources:
            {}
---
# Source: demo/templates/tests/test-connection.yaml
apiVersion: v1
kind: Pod
metadata:
  name: "release-name-demo-test-connection"
  labels:
    helm.sh/chart: demo-0.1.0
    app.kubernetes.io/name: demo
    app.kubernetes.io/instance: release-name
    app.kubernetes.io/version: "1.16.0"
    app.kubernetes.io/managed-by: Helm
  annotations:
    "helm.sh/hook": test
spec:
  containers:
    - name: wget
      image: busybox
      command: ['wget']
      args: ['release-name-demo:80']
  restartPolicy: Never
You can even change the values in values.yaml.
First navigate to the directory.
cd demothen open the values.yaml file
nano values.yamlChange the image reposiary shown below
image:
     repository: devopshint/node-app
After modification press ctrl + x, then shift + y and Enter.
Then lets modify deployment.yaml, navigate to template directory
cd templateopen deployment.yaml using,
nano deployment.yamlchange the apiversion
apiversion: apps/v2After modification press ctrl + x, then shift + y and Enter.
exit the directories using
cdnow run the template command again,
helm template demoOutput:
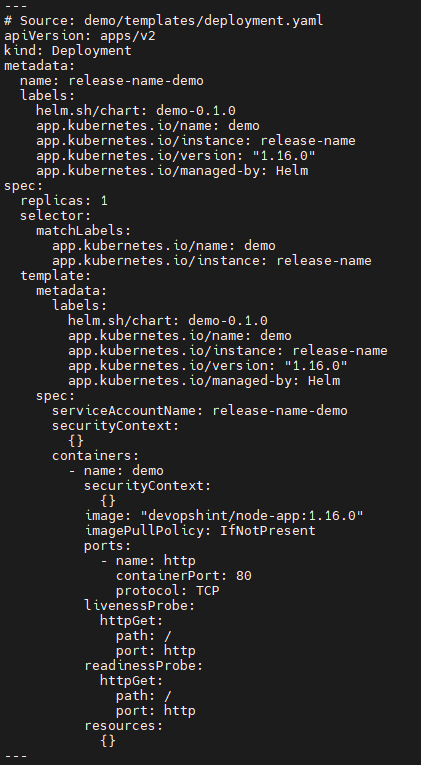
as you can see apiversion and image is successfully modified.
Now lets see what will happen if there is an error.
We will do the same steps like lint replacing ‘world’ with ‘demo’.
Now run the following command.
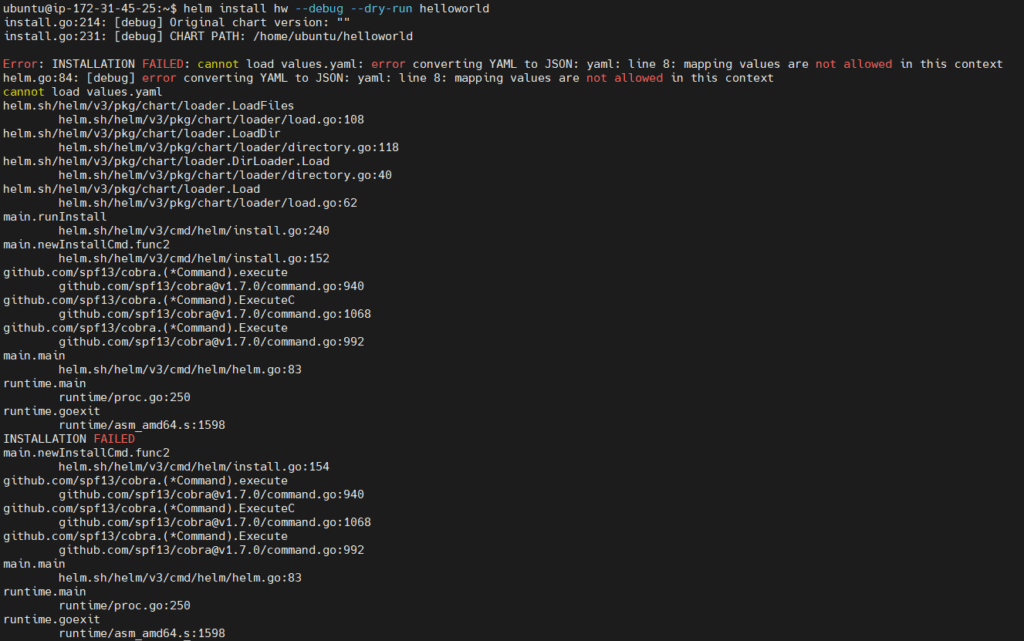
helm template demoAnd if Yaml files have wrong indentation, spacing, incorrect values and YAML syntax. Then it will throw an error and also tells where it is.

helm –debug –dry-run command use case with Examples
The helm debug --dry-run command is used to simulate a Helm release without actually installing anything on the cluster. It’s a useful way to preview what changes Helm would make to your Kubernetes resources without affecting the actual cluster.
- Preview Helm Chart Changes:
- When you run
helm debug --dry-run, Helm goes through the process of rendering the templates in your Helm chart and applying values, but it doesn’t actually perform the deployment.
- When you run
- Syntax and Template Checking:
- The
--dry-runflag allows you to catch potential errors in your Helm chart templates or values without making any changes to the live Kubernetes cluster. This is useful for verifying the syntax of your templates and ensuring they can be rendered correctly.
- The
- Check Configuration and Resources:
- It helps you check if the configuration values you’ve provided are being correctly applied to the Helm chart and whether the resulting Kubernetes resources are as expected.
- Avoid Unintended Changes:
- Using
--dry-runis a safety measure to prevent accidental changes to your Kubernetes cluster. By previewing the changes, you can make sure that you are deploying the right configuration before actually applying it.
- Using
Syntax:
helm install --dry-run --debug <release-name> <chart-name> -f values.yaml
--dry-run: Simulates the installation without making any changes to the cluster.--debug: Prints the generated Kubernetes manifests to the console for inspection.<release-name>: The name you want to give to the Helm release.<chart-name>: The name or path to the Helm chart.-f values.yaml: Specifies a values file to override default configuration.
Example:
First we will create a chart named ‘helloworld’ using helm create command. You can give any name you want to the chart.
helm create helloworld
then we will run the helm install myrelease --debug --dry-run command. Where my release name is ‘hw’. You can give any release name.
helm install hw --debug --dry-run
This command will output the generated manifests to the console without actually installing the chart along with NOTES. You can use this output to verify that the generated manifests are correct.
Output:
install.go:214: [debug] Original chart version: ""
install.go:231: [debug] CHART PATH: /home/ubuntu/helloworld

NAME: hw
LAST DEPLOYED: Tue Dec  5 09:14:51 2023
NAMESPACE: default
STATUS: pending-install
REVISION: 1
USER-SUPPLIED VALUES:
{}

COMPUTED VALUES:
affinity: {}
autoscaling:
  enabled: false
  maxReplicas: 100
  minReplicas: 1
  targetCPUUtilizationPercentage: 80
fullnameOverride: ""
image:
  pullPolicy: IfNotPresent
  repository: nginx
  tag: ""
imagePullSecrets: []
ingress:
  annotations: {}
  className: ""
  enabled: false
  hosts:
  - host: chart-example.local
    paths:
    - path: /
      pathType: ImplementationSpecific
  tls: []
nameOverride: ""
nodeSelector: {}
podAnnotations: {}
podLabels: {}
podSecurityContext: {}
replicaCount: 1
resources: {}
securityContext: {}
service:
  port: 80
  type: ClusterIP
serviceAccount:
  annotations: {}
  automount: true
  create: true
  name: ""
tolerations: []
volumeMounts: []
volumes: []

HOOKS:
---
# Source: helloworld/templates/tests/test-connection.yaml
apiVersion: v1
kind: Pod
metadata:
  name: "hw-helloworld-test-connection"
  labels:
    helm.sh/chart: helloworld-0.1.0
    app.kubernetes.io/name: helloworld
    app.kubernetes.io/instance: hw
    app.kubernetes.io/version: "1.16.0"
    app.kubernetes.io/managed-by: Helm
  annotations:
    "helm.sh/hook": test
spec:
  containers:
    - name: wget
      image: busybox
      command: ['wget']
      args: ['hw-helloworld:80']
  restartPolicy: Never
MANIFEST:
---
# Source: helloworld/templates/serviceaccount.yaml
apiVersion: v1
kind: ServiceAccount
metadata:
  name: hw-helloworld
  labels:
    helm.sh/chart: helloworld-0.1.0
    app.kubernetes.io/name: helloworld
    app.kubernetes.io/instance: hw
    app.kubernetes.io/version: "1.16.0"
    app.kubernetes.io/managed-by: Helm
automountServiceAccountToken: true
---
# Source: helloworld/templates/service.yaml
apiVersion: v1
kind: Service
metadata:
  name: hw-helloworld
  labels:
    helm.sh/chart: helloworld-0.1.0
    app.kubernetes.io/name: helloworld
    app.kubernetes.io/instance: hw
    app.kubernetes.io/version: "1.16.0"
    app.kubernetes.io/managed-by: Helm
spec:
  type: ClusterIP
  ports:
    - port: 80
      targetPort: http
      protocol: TCP
      name: http
  selector:
    app.kubernetes.io/name: helloworld
    app.kubernetes.io/instance: hw
---
# Source: helloworld/templates/deployment.yaml
apiVersion: apps/v1
kind: Deployment
metadata:
  name: hw-helloworld
  labels:
    helm.sh/chart: helloworld-0.1.0
    app.kubernetes.io/name: helloworld
    app.kubernetes.io/instance: hw
    app.kubernetes.io/version: "1.16.0"
    app.kubernetes.io/managed-by: Helm
spec:
  replicas: 1
  selector:
    matchLabels:
      app.kubernetes.io/name: helloworld
      app.kubernetes.io/instance: hw
  template:
    metadata:
      labels:
        helm.sh/chart: helloworld-0.1.0
        app.kubernetes.io/name: helloworld
        app.kubernetes.io/instance: hw
        app.kubernetes.io/version: "1.16.0"
        app.kubernetes.io/managed-by: Helm
    spec:
      serviceAccountName: hw-helloworld
      securityContext:
        {}
      containers:
        - name: helloworld
          securityContext:
            {}
          image: "nginx:1.16.0"
          imagePullPolicy: IfNotPresent
          ports:
            - name: http
              containerPort: 80
              protocol: TCP
          livenessProbe:
            httpGet:
              path: /
              port: http
          readinessProbe:
            httpGet:
              path: /
              port: http
          resources:
            {}

NOTES:
1. Get the application URL by running these commands:
  export POD_NAME=$(kubectl get pods --namespace default -l "app.kubernetes.io/name=helloworld,app.kubernetes.io/instance=hw" -o jsonpath="{.items[0].metadata.name}")
  export CONTAINER_PORT=$(kubectl get pod --namespace default $POD_NAME -o jsonpath="{.spec.containers[0].ports[0].containerPort}")
  echo "Visit http://127.0.0.1:8080 to use your application"
  kubectl --namespace default port-forward $POD_NAME 8080:$CONTAINER_PORT
And if there’s an error then it will not simulate a release install.
To see that we will follow the same steps used as lint and template.
after exiting the directory run the following command
helm install hw --debug --dry-run helloworldOutput:
similarly you can use helm upgrade --debug --dry-run which simulates the upgrade of an existing Helm release without applying the changes and allows you to preview the modifications before executing an actual upgrade.
First install the helm chart using following command
helm install hw helloworldOutput:

Now lets modify the values.yaml file
Navigate to the directory using following command
cd helloworldthen, use following command to edit values.yaml, we will edit repicaCount=2, and write a message
message: Hello, World! This is a customized message.nano values.yamlpress ctrl + x, then shift + y and Enter.
exit the directories using following command
cdNow perform the helm upgrade –dry-run
helm upgrade hw --debug --dry-run helloworldOutput:
ubuntu@ip-172-31-35-53:~$ helm upgrade hw --debug --dry-run helloworld
upgrade.go:153: [debug] preparing upgrade for hw
upgrade.go:161: [debug] performing update for hw
upgrade.go:345: [debug] dry run for hw
Release "hw" has been upgraded. Happy Helming!
NAME: hw
LAST DEPLOYED: Wed Dec  6 11:24:56 2023
NAMESPACE: default
STATUS: pending-upgrade
REVISION: 2
USER-SUPPLIED VALUES:
{}

COMPUTED VALUES:
affinity: {}
autoscaling:
  enabled: false
  maxReplicas: 100
  minReplicas: 1
  targetCPUUtilizationPercentage: 80
fullnameOverride: ""
image:
  pullPolicy: IfNotPresent
  repository: nginx
  tag: ""
imagePullSecrets: []
ingress:
  annotations: {}
  className: ""
  enabled: false
  hosts:
  - host: chart-example.local
    paths:
    - path: /
      pathType: ImplementationSpecific
  tls: []
message: Hello, World! This is a customized message.
nameOverride: ""
nodeSelector: {}
podAnnotations: {}
podLabels: {}
podSecurityContext: {}
replicaCount: 2
resources: {}
securityContext: {}
service:
  port: 80
  type: ClusterIP
serviceAccount:
  annotations: {}
  automount: true
  create: true
  name: ""
tolerations: []
volumeMounts: []
volumes: []

HOOKS:
---
# Source: helloworld/templates/tests/test-connection.yaml
apiVersion: v1
kind: Pod
metadata:
  name: "hw-helloworld-test-connection"
  labels:
    helm.sh/chart: helloworld-0.1.0
    app.kubernetes.io/name: helloworld
    app.kubernetes.io/instance: hw
    app.kubernetes.io/version: "1.16.0"
    app.kubernetes.io/managed-by: Helm
  annotations:
    "helm.sh/hook": test
spec:
  containers:
    - name: wget
      image: busybox
      command: ['wget']
      args: ['hw-helloworld:80']
  restartPolicy: Never
MANIFEST:
---
# Source: helloworld/templates/serviceaccount.yaml
apiVersion: v1
kind: ServiceAccount
metadata:
  name: hw-helloworld
  labels:
    helm.sh/chart: helloworld-0.1.0
    app.kubernetes.io/name: helloworld
    app.kubernetes.io/instance: hw
    app.kubernetes.io/version: "1.16.0"
    app.kubernetes.io/managed-by: Helm
automountServiceAccountToken: true
---
# Source: helloworld/templates/service.yaml
apiVersion: v1
kind: Service
metadata:
  name: hw-helloworld
  labels:
    helm.sh/chart: helloworld-0.1.0
    app.kubernetes.io/name: helloworld
    app.kubernetes.io/instance: hw
    app.kubernetes.io/version: "1.16.0"
    app.kubernetes.io/managed-by: Helm
spec:
  type: ClusterIP
  ports:
    - port: 80
      targetPort: http
      protocol: TCP
      name: http
  selector:
    app.kubernetes.io/name: helloworld
    app.kubernetes.io/instance: hw
---
# Source: helloworld/templates/deployment.yaml
apiVersion: apps/v1
kind: Deployment
metadata:
  name: hw-helloworld
  labels:
    helm.sh/chart: helloworld-0.1.0
    app.kubernetes.io/name: helloworld
    app.kubernetes.io/instance: hw
    app.kubernetes.io/version: "1.16.0"
    app.kubernetes.io/managed-by: Helm
spec:
  replicas: 2
  selector:
    matchLabels:
      app.kubernetes.io/name: helloworld
      app.kubernetes.io/instance: hw
  template:
    metadata:
      labels:
        helm.sh/chart: helloworld-0.1.0
        app.kubernetes.io/name: helloworld
        app.kubernetes.io/instance: hw
        app.kubernetes.io/version: "1.16.0"
        app.kubernetes.io/managed-by: Helm
    spec:
      serviceAccountName: hw-helloworld
      securityContext:
        {}
      containers:
        - name: helloworld
          securityContext:
            {}
          image: "nginx:1.16.0"
          imagePullPolicy: IfNotPresent
          ports:
            - name: http
              containerPort: 80
              protocol: TCP
          securityContext:
            {}
          image: "nginx:1.16.0"
          imagePullPolicy: IfNotPresent
          ports:
            - name: http
              containerPort: 80
              protocol: TCP
          livenessProbe:
            httpGet:
              path: /
              port: http
          readinessProbe:
            httpGet:
              path: /
              port: http
          resources:
            {}

NOTES:
1. Get the application URL by running these commands:
  export POD_NAME=$(kubectl get pods --namespace default -l "app.kubernetes.io/name=helloworld,app.kubernetes.io/instance=hw" -o jsonpath="{.items[0].metadata.name}")
  export CONTAINER_PORT=$(kubectl get pod --namespace default $POD_NAME -o jsonpath="{.spec.containers[0].ports[0].containerPort}")
  echo "Visit http://127.0.0.1:8080 to use your application"
  kubectl --namespace default port-forward $POD_NAME 8080:$CONTAINER_PORT
This will simulate the changes without applying them. It’s a way to preview the changes that would be made without making them.
Comparison of helm lint vs helm –debug –dry-run vs helm template command
| Feature | Helm Lint | Helm Template | Helm install –dry-run |
| Purpose | Check Helm Chart Validity | Generate Kubernetes YAML | Simulate a Release Install |
| Execution | helm lint <chart> | helm template <chart> | helm install –dry-run |
| Output | Console Output | Rendered Kubernetes YAML | Display Installation Info |
| Actual Installation | No actual installation | Rendered Kubernetes YAML | No actual installation |
| Error/Warning Check | Checks for Errors/Warnings | No error/warning checking | No error/warning checking |
| Validation | Validates Chart Structure | No validation performed | No validation performed |
| Customization | No customization allowed | Values can be overridden | Values can be overridden |
| Useful for Debugging | Yes, identify chart issues | Yes, inspect rendered YAML | Yes, check install output |
helm lint, helm template, helm install --dry-run. Each command serves a distinct purpose in Helm workflows, helping users generate Kubernetes manifests, check for issues in Helm charts, and simulate installations or upgrades without making actual changes to the cluster.Conclusion
In summary, while helm template and helm install --dry-run focus on rendering YAML and simulating installations, helm lint specifically targets chart validation, ensuring that the Helm chart is well-structured and follows best practices. Each of these Helm commands serves different purposes, and their combined use can contribute to a smooth Helm chart development and deployment process. Together, these Helm commands can help you improve the quality of your Helm charts and troubleshoot complex Kubernetes issues.
Related Articles:
How to Create Helm Chart for NodeJS App on Minikube
Reference: