In this article we are going to cover How to Push Maven Packages to GitLab Package Registry.
Table of Contents
What is Package Registry in GitLab ?
GitLab Package Registry is a feature within GitLab that allows you to store and manage various types of software packages and artifacts. It serves as a centralized location for storing, versioning, and distributing these packages, making it easier for development teams to collaborate and share code across projects.
GitLab Package Registry supports a variety of package types, including but not limited to:
- Maven Packages: For Java-based projects, you can use GitLab Package Registry to store and manage Maven artifacts like JAR files, WAR files, and other Java libraries.
- npm Packages: If you’re working with Node.js and JavaScript, you can use GitLab Package Registry to host and distribute npm packages.
- Docker Images: GitLab Container Registry is tightly integrated into GitLab Package Registry, allowing you to store and manage Docker container images for your containerized applications.
- RubyGems: For Ruby projects, you can store and distribute RubyGems packages.
- Python Packages: GitLab Package Registry supports Python packages, making it useful for Python developers who want to store and share their packages.
- Generic Packages: You can also use GitLab Package Registry to store generic packages or custom package types.
Key benefits of using GitLab Package Registry include:
- Centralization: All your project’s packages are stored within GitLab, making it easy to access and manage them in one place.
- Versioning: You can version your packages, ensuring that you have control over which version of a package is used in a project.
- Access Control: GitLab allows you to control who can access and publish packages, ensuring security and compliance.
- Integration: It seamlessly integrates with GitLab CI/CD pipelines, allowing you to automate the build, test, and deployment of your packages.
How to Push Maven Packages to GitLab Package Registry?
Step #1:How to Create Project Access Token in GitLab
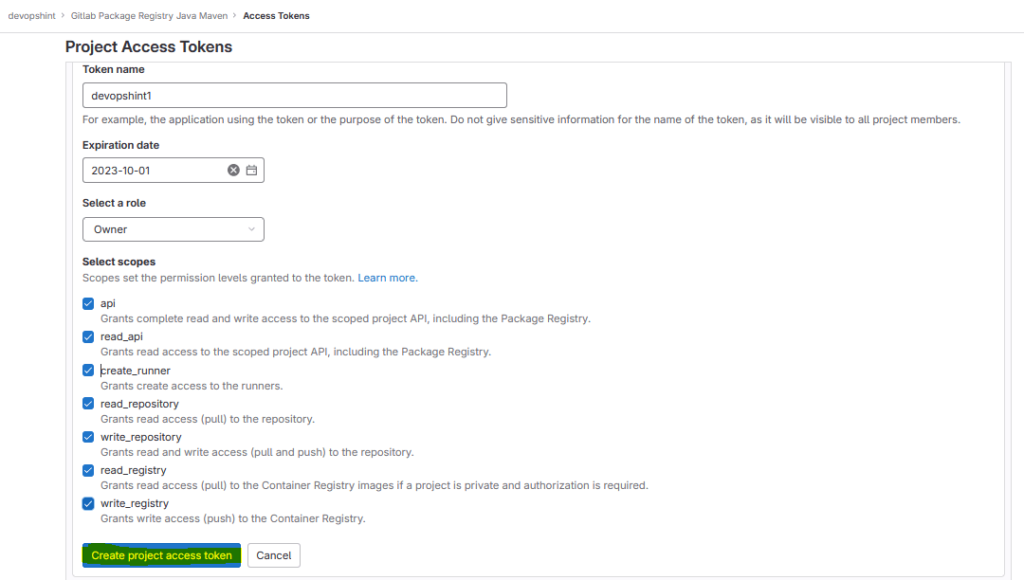
To generate a Project access token in GitLab, follow these steps: Access Your Repository Settings > Navigate to Access Tokens > Click on Add New Token

Configure the Access Token:
Provide a name for your access token in the “Name” field.
Select the desired expiration date for the token.
Select Scopes (Optional): GitLab allows you to specify scopes for your token. Scopes determine the level of access the token will have. You can select specific scopes based on your requirements. Common scopes include:
- api: Grants complete read and write access to the scoped project API, including the Package Registry.
- read_api: Grants read access to the scoped project API, including the Package Registry.
- create_runner: Grants create access to the runners.
- read_repository: Grants read access (pull) to the repository.
- write_repository: Grants read and write access (pull and push) to the repository.
- read_registry: Grants read access (pull) to the Container Registry images if a project is private and authorization is required.
- write_registry: Grants write access (push) to the Container Registry.
After configuring the access token settings and scopes, click the “Create Project access token” button.
Once the token is generated, GitLab will display the token’s value. This is your only chance to copy the token, so make sure to copy it to your clipboard and store it securely. Treat your access token like a password; anyone with access to it can perform actions on your behalf.
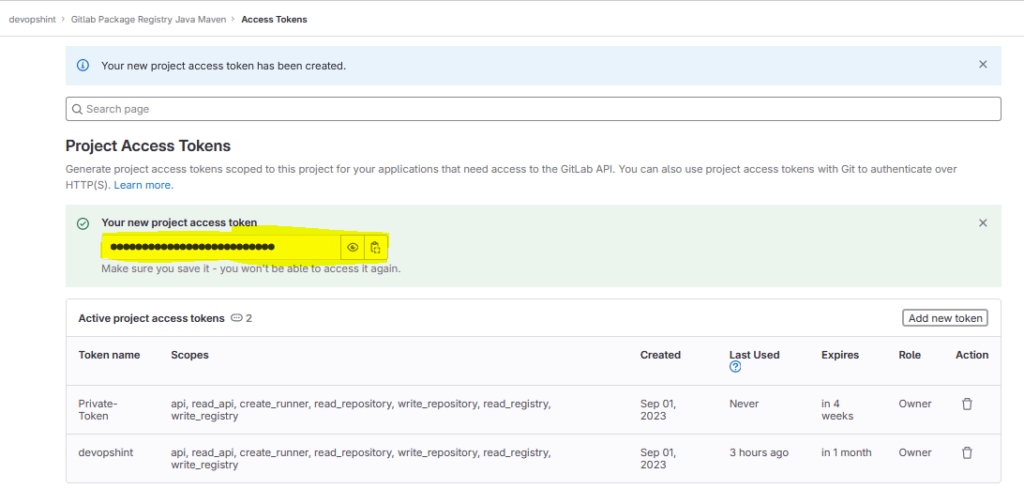
Note: Save the Token Securely in your notepad for future use.
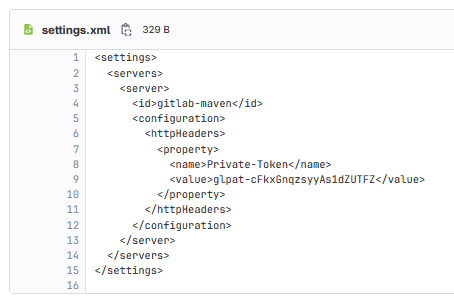
Step #2:Create setting.xml file in your GitLab repository and add below configuration in your settings.xml file
Create setting.xml file in your GitLab repository and add below configuration in your settings.xml file
<settings>
  <servers>
    <server>
      <id>gitlab-maven</id>
      <configuration>
        <httpHeaders>
          <property>
            <name>Private-Token</name>
            <value>REPLACE_WITH_YOUR_PROJECT_ACCESS_TOKEN</value>
          </property>
        </httpHeaders>
      </configuration>
    </server>
  </servers>
</settings>
In property value is copy the value of Project access token which you created.
Step #3:Add variable in your GitLab repository
Go to Your Repository Settings section > CI/CD > Variables
Expand the Variables Section: This is where you can add and manage your project-specific variables.
- Click on the “Add Variable” button.
- Provide a name for the variable in the “Key” field. This is the name you’ll use to reference the variable in your GitLab CI/CD configuration.
- Enter the value of the variable in the “Value” field. This can be the sensitive information you want to store, such as an API token or password.
- Optionally, you can mark the variable as “Protected” to make it available only to protected branches and tags.
- Click “Add Variable” to save the new variable.

Step #4:To add publishing details to your Maven pom.xml configuration file
add publishing details to your Maven pom.xml configuration file
<repositories>
  <repository>
    <id>gitlab-maven</id>
    <url>https://gitlab.com/api/v4/projects/PROJECT_ID/packages/maven</url>
  </repository>
</repositories>
<distributionManagement>
  <repository>
    <id>gitlab-maven</id>
    <url>https://gitlab.com/api/v4/projects/PROJECT_ID/packages/maven</url>
  </repository>
  <snapshotRepository>
    <id>gitlab-maven</id>
    <url>https://gitlab.com/api/v4/projects/PROJECT_ID/packages/maven</url>
  </snapshotRepository>
</distributionManagement>
Replace PROJECT_ID with variable name Key as ${PROJECT_ID} which you added the variable at endpoint url.
Step #5:Create .gitlab-ci.yml push maven packages to GitLab Package Registry
deploy:
  image: maven:latest
  script:
    - mvn deploy -s settings.xml
  only:
    - main
Monitor the Pipeline:
Go to your GitLab repository’s build section to monitor the progress of the pipeline.

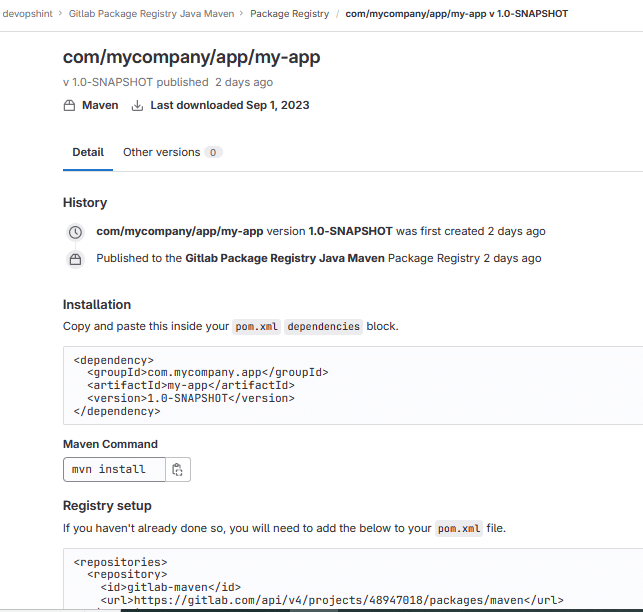
Step #6:To check maven package push to GitLab package registery
Go to project/particular repository > Deploy section > package registry
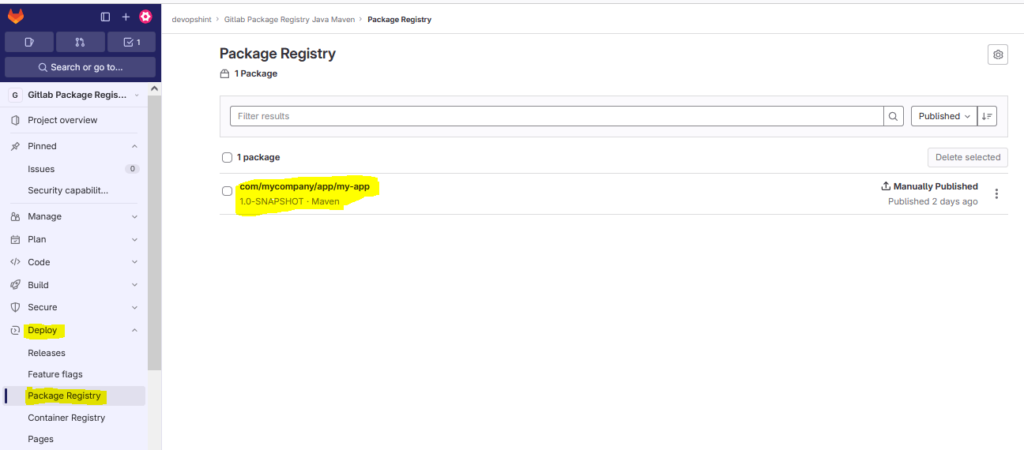
click on ‘com/mycompany/app/my-app’ package
Conclusion:
In this article we have covered How to Push Maven Packages to GitLab Package Registry.
Related Articles:
How to Create Group and Users in GitLab [2 Steps]
Reference: