In this article we are going to cover How to Use Environment Variables in helm chart with example. One of the key features of Helm is its ability to parameterize configurations using values files and environment variables. In this article, we’ll explore how to leverage environment variables in Helm charts to make deployments more flexible and configurable.
Table of Contents
Prerequisites
- AWS Account with Ubuntu 22.04 LTS EC2 Instance
- Minikube and kubectl Installed
Install Minikube and kubectl by following the official documentation for your operating system:
Install Minikube on Ubuntu 22.04 LTS
- Helm Installed:
Install Helm by following the official documentation:
Ways to use Environment variables in Helm Chart
Environment variables play a pivotal role in Helm charts by enabling dynamic configuration of deployments. They provide a powerful mechanism to inject values into templates, allowing you to tailor deployments to specific environments and adapt to changing conditions without modifying the chart itself.
There are couple of ways to access or pass Environment Variables
- Direct Injection with the
--setFlag - Centralized Management with
values.yaml
1. Direct Injection with the --set Flag:
For immediate value injection during deployment, Helm offers the --set flag. It’s used alongside helm install or helm upgrade commands to set specific environment variables.
Syntax:
helm install mychart --set myVariable=myValueExample:
First create a chart you give any name to it
helm create nodeapp
Now by default, helm chart has replicaCount=1.
lets see it. First install the chart
helm install mynodeapp nodeapp
then run the following command
kubectl get deploy
as you can see there is only 1 pod indicating 1 replica.
now delete the release
helm delete mynodeapp

So lets set it to 2 using --set.
helm install --set replicaCount=2 mynodeapp nodeapp
Lets check if it is set to 2 or not
kubectl get deploy
as you can see, now there are 2 pods ready indicating 2 replicas.
--set in helm also provides a way to use multiple values and you can override the values.
first again delete the release
helm delete mynodeapplets set the replicaCount=3
helm install --set replicaCount=2 --set replicaCount=3 mynodeapp nodeapp
Lets check if its set to 3 or not
kubectl get deploy
As you can see now there are 3 replicas
2.Centralized Management with values.yaml:
The values.yaml file serves as the heart of default configuration within a Helm chart. It’s where you define default environment variables.
Example:
First create a chart you give any name to it
helm create nodeappNow by default, helm chart has replicaCount=1.
lets see it. First install the chart
helm install mynodeapp nodeappthen run the following command
kubectl get deployas you can see there is only 1 pod indicating 1 replica.
Now again lets set replicaCount=2
first again delete the release
helm delete mynodeappcreate myvalues.yaml –
vi myvalues.yamlpress ‘i’ to enter insert mode
then add replica count entry to it.
replicaCount: 2
exit the insert mode using Esc then press ‘:wq’ to exit the file
Install the helm chart
helm install -f myvalues.yaml mynodeapp nodeapp
Verify the replica count status
kubectl get deploy
as you can see, now there are 2 pods ready indicating 2 replicas.
Now let’s see the example with the loop.
first again delete the release
helm delete mynodeapplets create env-values.yaml
vi env-values.yamlpress ‘i’ to enter insert mode
examplemap:
 - name: "USERNAME"
   value: "test1"
 - name: "PASSWORD"
value: "test2" 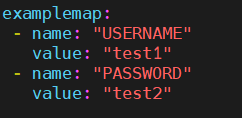
exit the insert mode using Esc then press ‘:wq’ to exit the file.
then open the template directory
cd nodeapp/templatesopen the deployment.yaml
nano deployment.yamlenv:
{{- range .Values.examplemap }}
- name: {{ .name }}
value: {{ .value }}
{{- end }}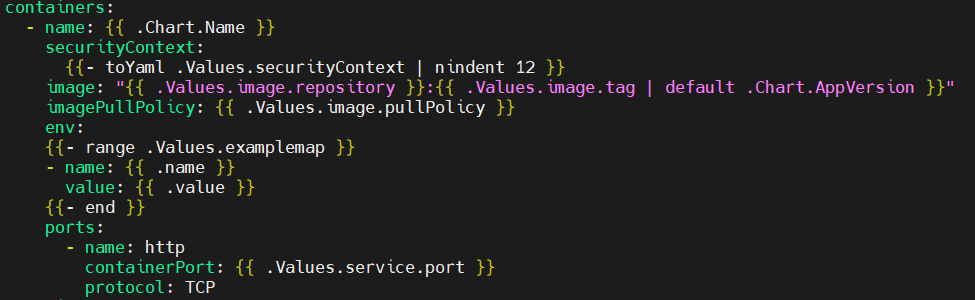
after modification press ctrl+x, shift+y and enter.
Now run the template command to see the yaml manifest.
helm template -f env-values.yaml nodeapp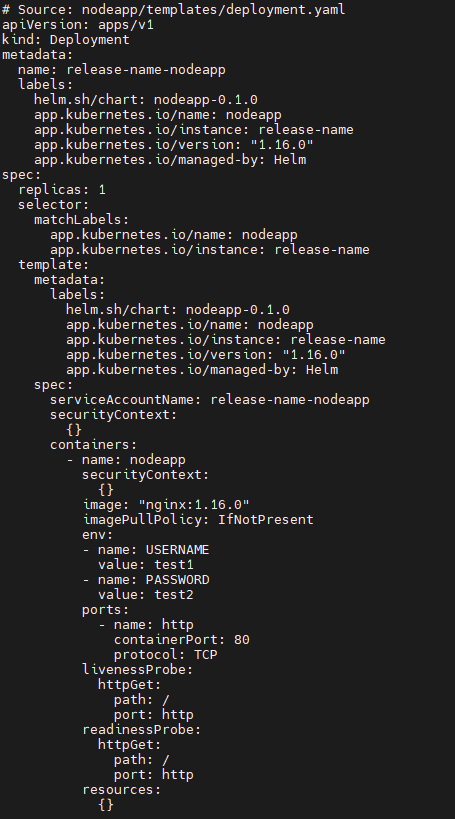
Now many people ask is overriding values.yaml possible?
so yes, it is
Now let’s override this value in myvalues-override.yaml
vi myvalues-override.yaml
press ‘i’ to enter insert mode
replicaCount: 3
exit the insert mode using Esc then press ‘:wq’ to exit the file.
Now lets see if our yaml file can be overridden.
helm install -f myvalues.yaml -f myvalues-override.yaml mynodeapp nodeapp
Verify the replica count status
kubectl get deploy
as you can see values file is overridden.
Benefits of using Environment variables
- Enhanced Flexibility and Adaptability:
- They enable seamless customization across environments like development, testing, and production, without touching code or configuration files. This flexibility allows for adapting to dynamic conditions based on external factors or user input, all without redeployments.
- Better Maintainability and Organization:
- Beyond flexibility, environment variables promote better maintainability and organization. They separate configuration data from code, making applications modular, easier to understand, and manage. Additionally, they centralize configuration changes, reducing the need for environment-specific code modifications.
- Enhanced Testing and Deployment:
- Environment variables also play a crucial role in enhanced testing and deployment. They facilitate mock testing by simulating different environments for comprehensive testing practices. Furthermore, they enable automated configuration updates during deployment pipelines, streamlining processes and accelerating deployments.
- Compliance and Auditing:
- The benefits extend to compliance and auditing. Environment variables help secure sensitive data by storing it outside code, aligning with security standards like GDPR and PCI-DSS. Additionally, they simplify auditing by making configuration changes easier to track.
Use cases of Environment Variables
1. Environment-Aware Configurations: Imagine crafting separate sets of settings for development, testing, and production environments. Environment variables come to the rescue! Store database connections, API keys, and logging levels as variables, eliminating the need to modify code each time you switch environments.
2. Securing Sensitive Secrets: Tucking away sensitive information like passwords or API keys directly in code is risky. Environment variables provide a safer haven. These values stay out of version control and logs, reducing exposure risks. Trust environment variables with your API keys, database credentials, and encryption keys for increased security.
3. Feature Toggles on Demand: Want to introduce a new feature but prefer a gradual rollout? Environment variables act as feature flags, toggling features on or off based on user roles, testing needs, or other criteria. Enable a new feature in your testing environment, controlled by an environment variable, before confidently unleashing it into production.
4. Personalization Made Easy: Let’s personalize! Environment variables can store user-specific settings, tailoring the application’s behavior to individual preferences. This way, users can control their preferred language, time zone, or other settings, enhancing their experience without any hardcoded modifications.
Conclusion:
In conclusion, helm’s support for environment variables provides a powerful mechanism for configuring applications in Kubernetes. By leveraging values files and environment variables, you can create Helm charts that are not only reusable but also adaptable to different deployment scenarios. This approach enhances the maintainability and scalability of your Kubernetes applications.
Related Articles: