In this article we are going to cover How To Create ElastiCache MemCached Cluster in AWS Using Terraform | How To Create MemCached Cluster in AWS Using Terraform.
In this guide, you’ll discover how to set up a Amazon ElastiCache MemCached using Terraform. The best part is, all the steps we’ll cover can be done without incurring any extra costs because they’re eligible for the Free Tier.
Table of Contents
Amazon ElastiCache?

Amazon ElastiCache is a Caching-as-a-Service from Amazon Web Services. AWS simplifies setting up, managing, and scaling a distributed in-memory cache environment in the cloud. It provides a high-performance, scalable, and cost-effective caching solution. AWS removes the complexity associated with deploying and managing a distributed cache environment.
Amazon ElastiCache is a fully managed, in-memory data store service provided by Amazon Web Services (AWS). It is designed to enhance the performance and scalability of applications by providing a managed caching solution. ElastiCache supports two popular in-memory caching engines: Memcached and Redis. Here’s an overview of Amazon ElastiCache and its key features:
Key Features of Amazon ElastiCache:
- Managed Caching: ElastiCache handles the complex tasks of setting up, configuring, and managing caching infrastructure. It allows you to focus on your application’s logic without worrying about cache management.
- In-Memory Data Stores: ElastiCache supports two popular in-memory data store engines: Memcached: Memcached is a simple and fast caching engine that supports simple key-value data storage and retrieval. It is ideal for use cases where you need high-speed caching with minimal complexity. Redis: Redis is a highly versatile, open-source, in-memory data store that supports more advanced data structures, such as sorted sets, hashes, and lists. It is often used for caching, real-time analytics, and as a message broker.
- Scalability: ElastiCache allows you to easily scale your cache cluster vertically by selecting different instance types and horizontally by adding or removing cache nodes. This ensures your cache can handle increased workloads as your application grows.
- Automatic Failover: Redis clusters in ElastiCache can be configured with automatic failover. If a primary node fails, ElastiCache automatically promotes a read replica to the primary role, minimizing downtime.
- Backups and Restores: ElastiCache provides the ability to take manual snapshots of your cache clusters. You can use these snapshots to restore your cache data or clone cache clusters.
What is ElastiCache Memcached in AWS?
Memcached is one of the caching engines supported by AWS ElastiCache. Memcached is a popular in-memory caching system used to improve the performance of web applications by storing frequently accessed data in memory. Until now we have discussed both the caching engines, but I may seem biased towards Redis.
Memcached is an open-source, high-performance, distributed in-memory caching system. It is commonly used to speed up data retrieval operations by caching frequently accessed data in memory, reducing the need to fetch data from slower data stores such as databases.
So the question is, if Redis is all powerful, then why doesn’t ElastiCache provide only Redis? There are few good reasons for using Memcached:
- It is the simplest caching model.
- It is helpful for people needing to run large nodes with multiple cores or threads.
- It offers the ability to scale out/in, adding and removing nodes on-demand.
- It handles partitioning data across multiple shards.
Prerequisites
Before you begin, you should have the following prerequisites in place:
- You’ll need an Amazon Web Services (AWS) account. If you don’t have one, you can sign up for a free AWS account.
- Basic knowledge of AWS services and concepts.
- Visual Studio on your system.
- Hashicorp Terraform Extension. You can download it from the official Terraform website.
How To Create MemCached Cluster in AWS Using Terraform
Steps for implementation to this project
- Let’s create the following organizational structure as shown below.
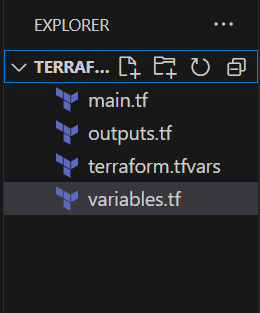
- Create a Folder – terraform-memcachedb
- Create 4 Files in our terraform-memcachedb – 1) variables.tf 2) terraform.tfvars 3) main.tf and 4) outputs.tf.
variables.tf– In Terraform, thevariables.tffile is used to declare and define variables that can be referenced in your Terraform configuration files (typically files with a.tfextension). These variables act as parameters that allow you to customize your Terraform configuration and provide values dynamically. Thevariables.tffile is where you define the variables, their types, and, in some cases, their default values.- Variable Declaration: This is where you define your variables using the
variablekeyword, followed by the variable name. For example: - Using
variables.tffile: It helps in making your Terraform configuration more modular and adaptable. By centralizing variable definitions, you can easily manage and update configuration values without having to modify multiple places in your code. It also promotes reusability and clarity in your Terraform projects.
- Variable Declaration: This is where you define your variables using the
variable "example_variable" {
  type        = string
  description = "An example variable"
}terraform.tfvars– In Terraform, theterraform.tfvarsfile is used to store input variables and their values in a key-value pair format. This file allows you to set values for variables used in your Terraform configuration without hardcoding them directly in the Terraform files (e.g.,.tffiles). The nameterraform.tfvarsis the default filename, but you can also use other filenames and specify them with the-var-fileoption when running Terraform commands. This separation of variable values makes it easier to manage and share configurations with different values for different environments.main.tf– In Terraform,main.tfis a default and conventional name for the main configuration file. This file is where you define the infrastructure resources and their configurations using HashiCorp Configuration Language (HCL). Themain.tffile is essentially the entry point for Terraform to understand how to create, update, and manage your infrastructure. Key points aboutmain.tf:main.tfis a naming convention, not a strict requirement. You can name your main configuration file differently if you prefer, butmain.tfis widely used and recognized.- Inside
main.tf, you specify the resources you want to create (e.g., AWS instances, databases, networks) and their configurations using Terraform syntax. This includes resource types, attributes, and any other settings required. main.tfcan also include declarations for variables and outputs. Variables allow you to parameterize your configuration, making it more reusable, while outputs provide a way to expose certain values to be easily queried or used by other systems.- Here’s a basic example of what a simple
main.tffile might look like:
# main.tf

provider "aws" {
  region = "us-east-1"
}

resource "aws_elasticache_cluster" "example" {
  cluster_id           = "cluster-example"
  engine               = "memcached"
  node_type            = "cache.m4.large"
  num_cache_nodes      = 1
  parameter_group_name = "default.memcached1.4"
  port                 = 11211
}outputs.tf– In Terraform, theoutputs.tffile is used to define output values that can be displayed after the execution of the Terraform configuration. This file allows you to expose specific information about the resources you’ve created or modified during the Terraform run. Outputs are useful for providing useful information or data to users or external systems.- In the
outputs.tffile, you define one or more output blocks. Each block specifies a named output and the value you want to expose. - Using
outputs.tfenhances the usability and interoperability of your Terraform configurations by making key information easily accessible. It’s a way to communicate important data between different parts of your infrastructure or share it with users and systems consuming the Terraform outputs. - In this example, an output named “example_output” is defined, and its value is set to the ID of an aws_elasticache_cluster created in the Terraform configuration.
- In the
output "example_output" {
  value = aws_elasticache_cluster.example.id.arn
}
Create a variables.tf file in terraform-memcachedb folder
- Enter the below code
- Create a
variables.tffile.
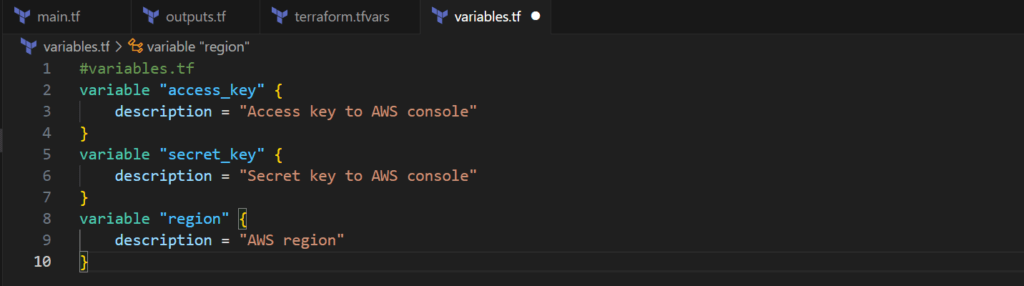
#variables.tf
variable "access_key" {
    description = "Access key to AWS console"
}
variable "secret_key" {
    description = "Secret key to AWS console"
}
variable "region" {
    description = "AWS region"
}
Create a terraform.tfvars file in terraform-memcachedb folder
- Create a
terraform.tfvarsfile. - You are defining the dynamic values for the variables declared in variables.tf file.
#terraform.tfvars
region = "us-east-1"
access_key = "<YOUR AWS CONSOLE ACCESS ID>"
secret_key = "<YOUR AWS CONSOLE SECRET KEY>"

Create a main.tf file in terraform-memcachedb folder
- Create a
main.tffile.
#main.tf
#defining the provider as aws
provider "aws" {
    region     = "${var.region}"
    access_key = "${var.access_key}"
    secret_key = "${var.secret_key}"
}

#create a ElastiCache MemCached Cluster
resource "aws_elasticache_cluster" "demo_cluster" {
  cluster_id           = "demo-cluster"
  engine               = "memcached"
  node_type            = "cache.t4g.micro"
  num_cache_nodes      = 2
  port                 = 11211
  tags = {
    Name = "mynewcluster"
  }
}

Create a output.tf file in terraform-memcachedb folder
- Create an
outputs.tffile. - Outputs the ElastiCache MemCached endpoint to confirm that they are created.
#outputs.tf

output "elasticache_cluster_endpoint" {
  value       = aws_elasticache_cluster.demo_cluster.arn
}
Initialize and Apply Terraform Configuration
- Open a terminal in the directory containing your
main.tffile and run the following commands:
terraform init

- By running
terraform plan, you get a detailed list of these three categories— Additions, Modifications, and Deletions. It’s a way for you to review and confirm that Terraform understands your intentions correctly.
terraform plan


- Once you’re satisfied with the plan, you can proceed to apply those changes using
terraform apply. - This two-step process—
terraform planfollowed byterraform apply—helps prevent unintended or accidental changes to your infrastructure. It gives you a chance to review and approve the proposed changes before Terraform makes any modifications to your environment.
terraform apply -auto-approve


- Wait for 5-6 minutes till all the resources have been created.
- Go to ElastiCache Console, Click on the MemCached , You can see ElastiCache MemCached Cluster created successfully.
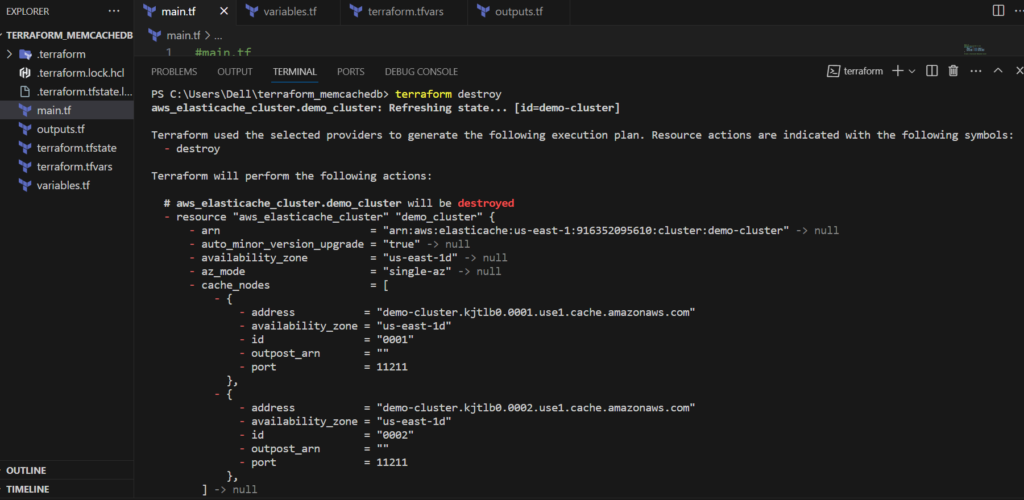
Delete AWS MemCached Cluster Using Terraform
- Run this below command to destroy your resources.
terraform destroy


Conclusion
In this article, we’ve demonstrated How to Create Elasticache MemCached Cluster in AWS using Terraform | MemCached Cluster in AWS Using Terraform and destroyed it later not to incur charges.
Reference:-
- For reference visit the official website TerraformRegistry.
- Any queries please contact us @Devopshint.
Related Articles: