In this article we are going to cover Integrate SonarScanner for Gradle Project for analyzing a Java project in SonarQube?.
What is SonarScanner for gradle?
SonarScanner for Gradle is a plugin that allows you to easily integrate SonarQube, a popular code quality and security analysis tool, into your Gradle-based projects. This plugin enables you to run static code analysis on your codebase and generate detailed reports to identify bugs, security vulnerabilities, code smells, and other quality issues.
Prerequisite:
- Ensure you have Java installed on your machine.
- Ensure you have SonarQube installed and running.
- Make sure Gradle is installed and configured on your machine.
How To use SonarScanner for Gradle project?
To use SonarScanner with a Gradle project, here are the steps:
Step #1:Install the SonarQube plugin in Gradle:
Open your project’s build.gradle file and add the SonarQube plugin:
plugins {
    id "org.sonarqube" version "3.3"
}
Step #2:Configure SonarQube properties in your Gradle build file:
Add the SonarQube configuration to your build.gradle file:
sonarqube {
    properties {
        property "sonar.host.url", "http://localhost:9000" // Replace with your SonarQube server URL
        property "sonar.projectKey", "your_project_key"
        property "sonar.projectName", "Your Project Name"
        // Add other required properties here
    }
}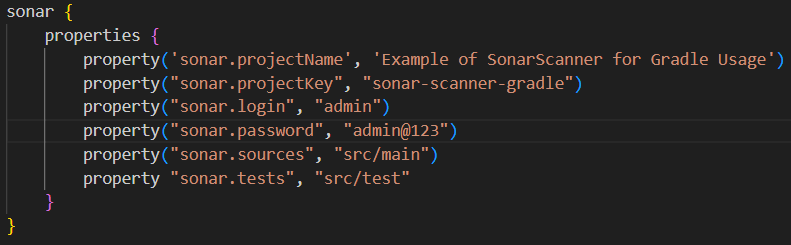
Let’s go through what each of these properties means:
sonar.projectName: Specifies the name of the project in SonarQube.sonar.projectKey: Represents a unique identifier for your project in SonarQube.sonar.loginandsonar.password: Credentials for authentication if your SonarQube instance requires them. However, passing credentials directly in the build script might not be secure; consider using environment variables or other secure methods.sonar.sources: Indicates the source code directory for the main application code.sonar.tests: Specifies the directory containing the test source code.
Step #3:Run the SonarScanner command:
Open your terminal, navigate to your project’s directory, and execute the following command:
./gradlew sonarqube

This command will trigger the SonarScanner analysis and send the results to your configured SonarQube server.
Step #4:View SonarQube Analysis Results:
Access your SonarQube dashboard through a web browser using the specified URL (http://localhost:9000 by default). Navigate to your project to view the analysis results, code quality metrics, and reports.
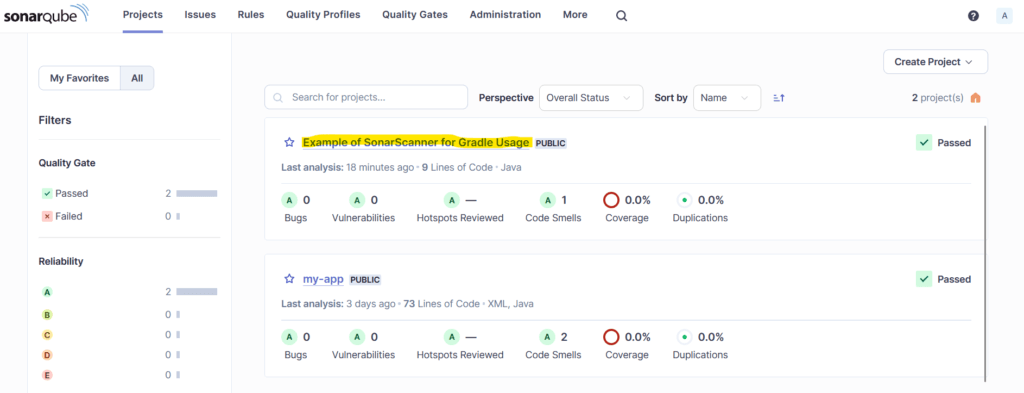
This process integrates SonarQube analysis seamlessly into your Gradle project, allowing you to monitor code quality and perform static code analysis. Adjust the configuration as needed based on your project’s requirements and SonarQube server settings.
Conclusion:
In this article we have covered Integrate SonarScanner for Gradle Project for analyzing a Java project in SonarQube?.
Related Articles:
How to Integrate SonarScanner for Maven Project
Reference: